Whether you’re a traveler crossing state lines or a homeowner looking to bolster your family’s emergency preparedness, GMRS (General Mobile Radio Service) is one of the most practical tools in your kit. While handheld-to-handheld (simplex) range is fine for a hike, repeaters are what truly unlock the potential of the service, turning a 2-mile radio into a 50-mile lifeline.
What is a GMRS Repeater?
In simple terms, a repeater is a powerful radio station located on a high point—like a hilltop, a tower, or a tall building. It “listens” for your signal on one frequency and simultaneously “retransmits” it on another at much higher power.
• Simplex: Radio A talks directly to Radio B. (Range: 1–5 miles)
• Repeater: Radio A talks to the Repeater, which then blasts that signal out to Radio B. (Range: 20–50+ miles)
The Traveler’s Advantage
If you are on the road, GMRS repeaters provide a level of security that cell phones can’t match in “dead zones.”
• Finding Repeaters: Before you head out, check resources like myGMRS.com. It’s the gold standard for GMRS directories. You can see maps of active repeaters along your route and find out if they are “Open” or “Permission Required.”
• The Travel Tone: Many repeaters intended for traveler assistance use a standard 141.3 Hz CTCSS tone. It’s a good idea to program your “traveler” channels with this tone as a starting point.
• Scanning: If you’re in a new area and don’t have the data, set your radio to scan the 8 repeater channels (15–22) with “Carrier Squelch” (no tones) to see where the local activity is.
Home & Emergency Use
For the home user, a repeater acts as a “community hub.” During a power outage or when cell towers are overwhelmed, a local repeater allows neighbors and family members to stay coordinated.
• Family Coverage: One GMRS license covers your entire immediate family. This makes it incredibly cost-effective to get everyone a radio and teach them how to hit the local repeater.
• Base Stations: Using a 15W to 50W mobile radio as a base station with an external antenna on your roof will significantly improve your ability to reach distant repeaters compared to a small handheld.
Repeater Etiquette: The Unwritten Rules
Since most repeaters are privately owned and maintained by enthusiasts, following the rules keeps the community healthy:
1. Identify Yourself: FCC rules require you to state your call sign every 15 minutes and at the end of your conversation.
2. Listen First: Before you key up, listen for a few seconds to make sure you aren’t interrupting an ongoing conversation.
3. The “Pause”: After you press the Push-to-Talk (PTT) button, wait about one second before speaking. Repeaters often have a slight delay in “waking up,” and this prevents your first few words from being cut off.
4. No Roger Beeps: Most repeater owners find the “beep” at the end of a transmission annoying and unnecessary. It’s best to turn it off in your settings.
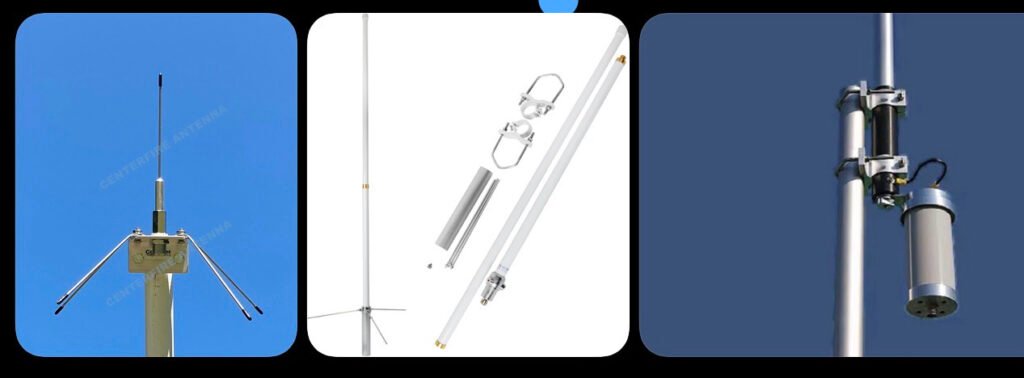
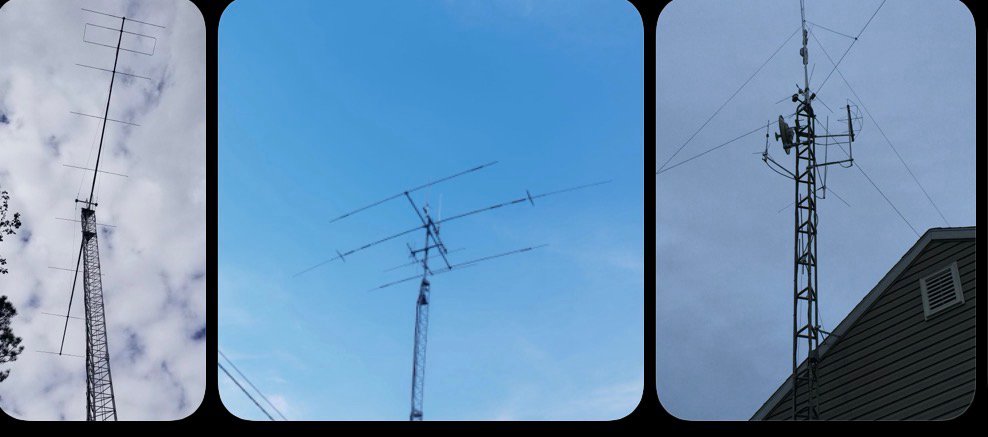
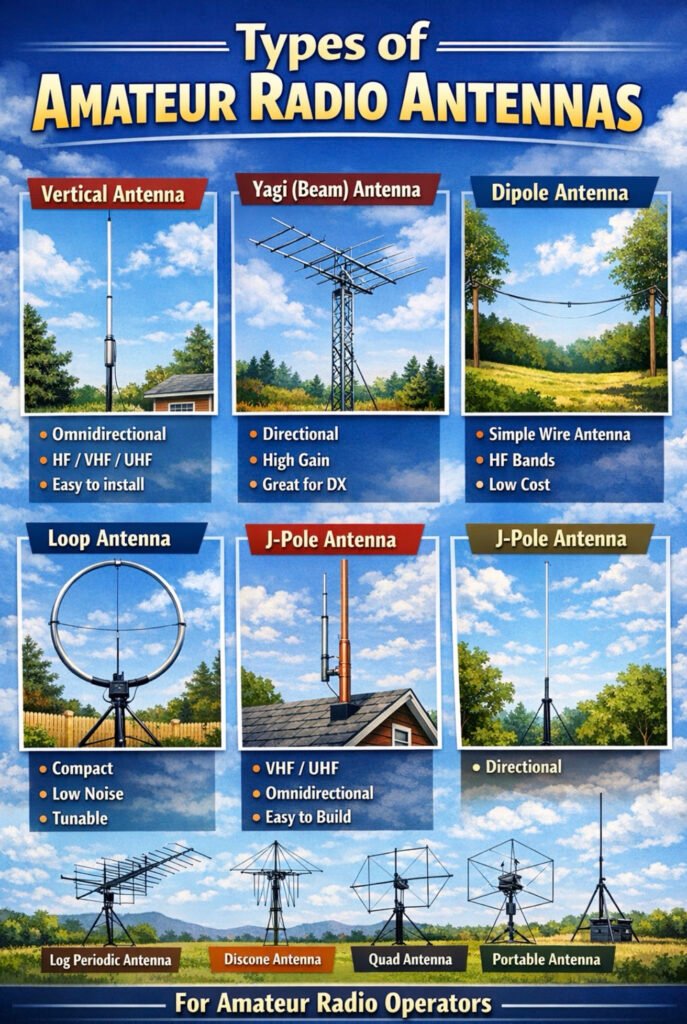
Here are some of the most common amateur (ham) radio antenna types you’ll encounter. Since you already have a pretty advanced antenna setup at your house (flagpole mast with HF and VHF/UHF antennas), this will help visualize the broader landscape of antenna designs.
Vertical Antenna
Description
Mounted vertically and radiates equally in all directions (omnidirectional). Common for HF, VHF, and UHF base stations. Often fiberglass with internal wire elements.
Pros
Simple installation Good for general coverage Small footprint
Cons
Typically lower gain than directional antennas.
Yagi (Beam) Antenna
Description
Directional antenna with multiple elements. Focuses signal in one direction for long-distance communication.
Pros
High gain Excellent for DX contacts Reduces interference from other directions
Cons
Large and requires a rotor More expensive and complex.
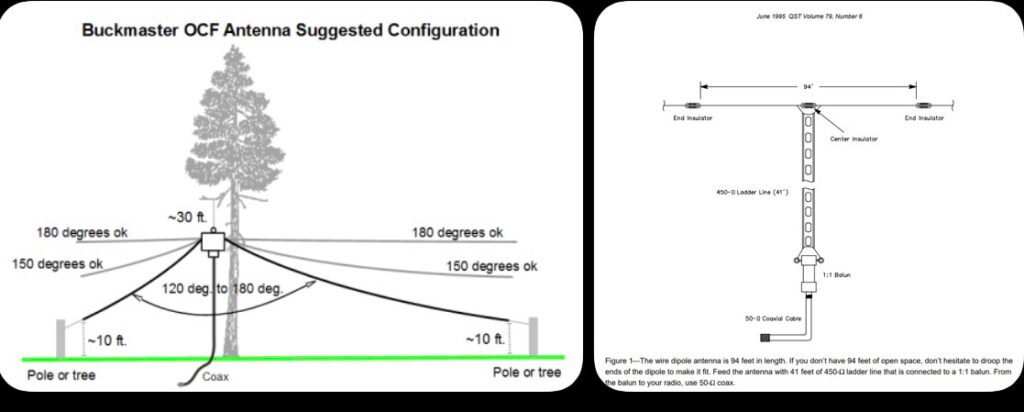
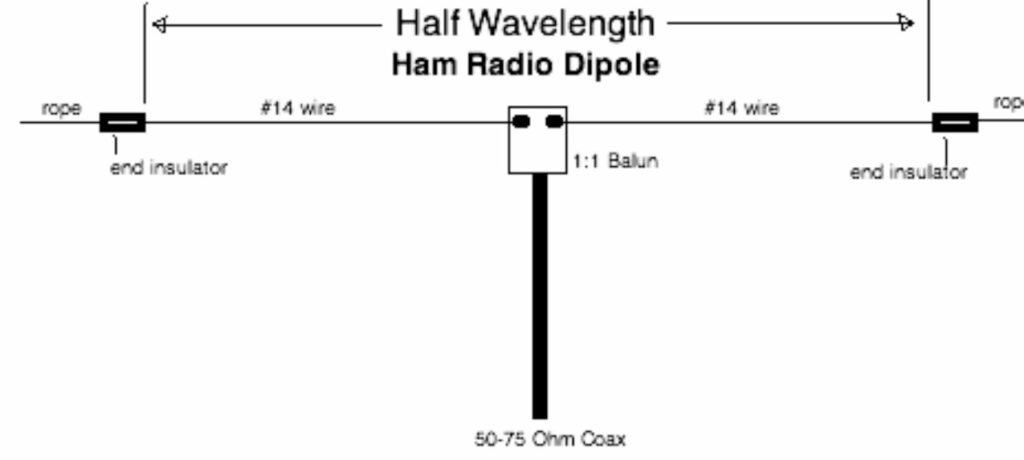
Dipole Antenna
Description
One of the simplest and most effective HF antennas. Two wire elements fed from the center.
Pros
Cheap and easy to build Very efficient Great for HF bands
Cons
Requires space between two supports.
Loop Antenna
Description
Circular or square loop used for HF operation. Often used in limited space environments.
Pros
Compact Very quiet receive characteristics Works well in apartments
Cons
Narrow bandwidth Requires tuning.
J-Pole Antenna
Description
Very common VHF/UHF antenna design. Essentially a half-wave radiator fed by a quarter-wave matching stub.
Pros
Simple design Omnidirectional Great for repeaters and local communication
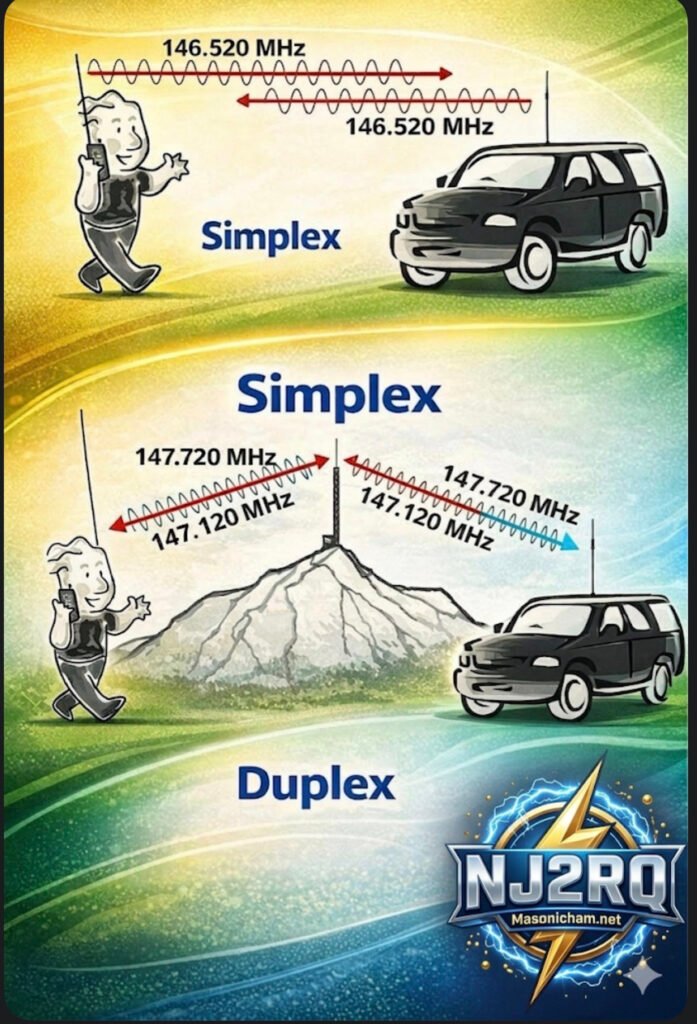
Have you ever key-ed up your handheld radio, ready to ask a friend across town how their day is, and then paused, paralyzed by the cryptic instructions on your radio’s screen or the unfamiliar terms you hear on the air? The world of amateur radio, or “ham” radio, is full of exciting possibilities, but it can also be a maze of technical jargon. Fear not, fellow operator! Today, we’re pulling back the curtain on one of the most fundamental concepts in our hobby: Simplex versus Duplex, or the fascinating world of repeaters.
Take a look at this detailed infographic we’ve put together. It’s designed to make these core concepts crystal clear, but sometimes a visual guide is even better with a companion explanation. Let’s break it down, section by section, starting with the simplest form of communication.
Figure A: The Simplex – When Simple is Best
Think of the Simplex pattern, shown on the far left of the diagram, as a focused flashlight beam in the pitch-black night. It’s direct, straightforward, and covers a wide area for local communication.
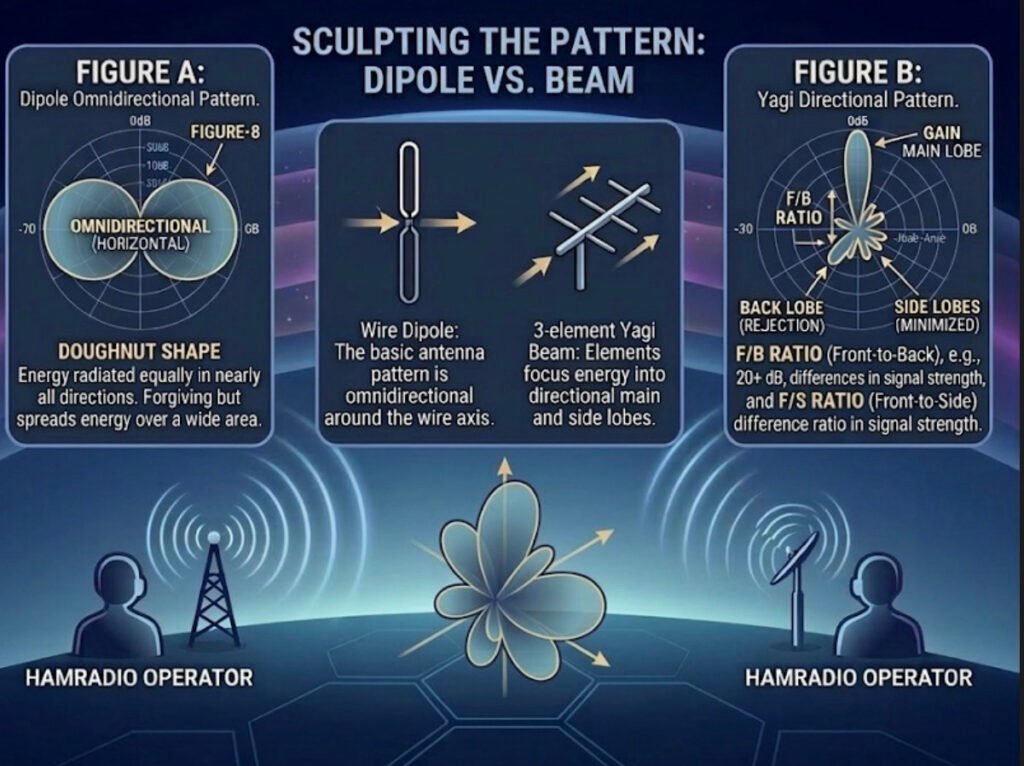
Here, we’re comparing it specifically to a simple dipole antenna—the oldest and most common type of antenna in the ham radio world. The pattern itself, that large “Figure-8” you see in Figure A, is a 2D slice of how the energy radiates from that horizontal wire. It’s called an “Omnidirectional (Horizontal)” pattern, often described as a “Doughnut Shape.”
What does this mean for you as an operator?
This pattern is excellent for broad, local communication because your energy is radiated almost equally in every direction away from the axis of the antenna. You don’t need a massive, rotating antenna tower or a highly-tuned beam to make successful local contacts on the 2m or 70cm bands. This is also the fundamental behavior of every dipole antenna, making it the bedrock of antenna design. But as the text notes, because it’s so “forgiving” and spreads that energy out over a vast 360-degree area, your signal becomes relatively weak by the time it reaches a very distant receiver. To reach over greater distances with less power, we need to get more directional.
Sculpting the Pattern: Dipole VS. Beam
The central panel shows the transition. We can take that basic, spread-out dipole pattern and “sculpt” it by adding a few carefully calculated passive elements. This creates the pattern on the right: a highly-focused directional beam, which acts more like a high-intensity laser than a broad flashlight.
As illustrated, adding a simple reflector element behind the original dipole element (which is now the “driven element”) and perhaps a few smaller director elements in front of it will dramatically change how the energy behaves. The 3-element Yagi beam on the right, for example, is a classic design that achieves this transformation. You focus and redirect that otherwise wasted energy from the back and sides, concentrating it all into one powerful lobe of gain.
Figure B: The Yagi Beam – Focus and Gain for the Real-World Advantage
This brings us to the most complex and exciting part of the chart: Figure B, the Yagi Directional Pattern. Here, that same energy is now shaped into a main, powerful lobe pointing directly at your target. But that focus comes with complexity, creating several distinct lobes that every operator should understand:
• MAIN LOBE: This is your best friend. It is the peak concentration of all your focused power. When propaganda conditions are tough, this is the lobe that can punch your signal through to that rare DX contact.
• GAIN: This is the practical advantage that all this focus buys you. It’s measured in decibels (dB) and essentially represents how much “louder” you appear to the other station compared to that reference dipole we started with. More gain is almost always better for overcoming noise or distance.
• BACK LOBE (REJECTION): The mirror image of the main lobe, but often much smaller. Good antenna designs minimize this to prevent picking up unwanted noise or interfering signals from the wrong direction. The goal is to maximize “REJECTION,” making your antenna blind to signals from behind.
• SIDE LOBES (MINIMIZED): These are like secondary beams that point in unwanted directions. Just like back lobes, a high-quality antenna will minimize these to optimize efficiency.
• F/B RATIO (Front-to-Back): This is a critical measurement. A ratio like 20+ dB, as noted, means your main signal is 20 dB (or 100 times!) stronger than the signal coming in from the exact opposite direction. This is the difference between a clear, one-on-one contact and a chaotic interference fest.
• F/S RATIO (Front-to-Side): Similar to the F/B ratio, but measured against the side lobes. It tells you how effective the antenna is at filtering out noise and other stations that are off-axis to your main direction. A high F/S ratio makes for a quieter, more focused receiver.
The Real-World Connection: Hamradio Operator QTH A to QTH B
Finally, the bottom of the infographic puts these abstract concepts into a real-world scenario. Two operators, HAMRADIO OPERATOR (QTH A) and HAMRADIO OPERATOR (QTH B), are trying to connect over a challenging distance.
When the propagation is tricky (maybe the solar flux is low), simply pointing their high-gain Yagi beams at each other (the “Doughnut Shape” versus the “laser focus”) can make all the difference. Their 3D multi-petal beam visualization illustrates how they are sculpting the ideal propagation path with focused energy to maximize their odds of a successful contact. It’s not just about raw power; it’s about smart, efficient design.
The Bottom Line:
An infographic like this is a powerful visual reminder that as ham radio operators, we’re not just users of technology—we’re engineers of our own signals. By understanding these concepts and using the right tools, whether it’s the simplicity of a dipole or the surgical precision of a high-gain beam, you can make smarter decisions, overcome limitations, and truly unlock the potential of your radio setup.
What kind of antenna patterns are you using at your station? Share your experiences in the comments below, and let’s keep the discussion focused and forward-looking.
In our last post, we explored how the ionosphere is a moving, shimmering curtain that creates signal fluctuations like QSB and Fading. But understanding propagation is only half the battle. To effectively communicate on the HF bands, you also need to understand your Antenna Radiation Pattern. This pattern is essentially a blueprint of where your antenna sends (or receives) energy.
Let’s look at this comparison diagram to visualize why a dipole in your backyard behaves so differently from a large multi-element Yagi beam.
The Power of Focus: Omindirectional vs. Directional
An antenna’s pattern is a 3D plot of its relative field strength. This diagram simplifies it into a horizontal 2D slice, which is perfect for understanding directional gain.
1. The Omnidirectional “Doughnut” (Figure A – Dipole)
The pattern on the left is typical of a horizontally oriented dipole antenna.
• What it means: Energy is radiated broadly in nearly all directions. It is “omnidirectional” in the horizontal plane (forming a doughnut shape around the wire).
• The Takeaway: This is excellent for general operating and making contacts without needing to rotate your antenna. It’s forgiving, but it spreads your energy thin over a vast area.
2. The Directional “Flashlight” (Figure B – Beam)
The pattern on the right shows a high-gain directional antenna, like a Yagi or quad loop array. Notice how the energy isn’t just a circle; it’s sculpted into distinct lobes.
• The Main Lobe: This is where the majority of your energy is focused. It acts like a powerful flashlight beam, concentrating power in one specific direction.
• The Back and Side Lobes: This is “wasted” or secondary energy radiating in directions you aren’t trying to target. High-quality antenna designs minimize these to maximize the main lobe.
• The Gain Effect: By focusing your 100 watts into that narrow main lobe instead of a big omnidirectional doughnut, your signal “appears” many times stronger at the distant receiving station. This is called antenna gain.
3. Front-to-Back (F/B) and Front-to-Side (F/S) Ratios
A key specification for any directional antenna is how well it rejects signals from the sides and back.
• F/B Ratio: This is the difference in signal strength between the peak of the Main Lobe (front) and the peak of the Back Lobe. A high ratio (e.g., 20+ dB) means that weak stations behind you will be much quieter, helping you focus on the station you are aiming for.
• F/S Ratio: Similarly, this is the difference between the main lobe and the Side Lobes. It tells you how effective the antenna is at “ignoring” noise or interference from directions other than your primary target.
Your Signal is a Laser, Not a Floodlight
Thinking about your antenna pattern is crucial. When propagation is challenging, a few extra dB of focused gain from a directional antenna can be the difference between a successful QSO and vanishing into the noise.
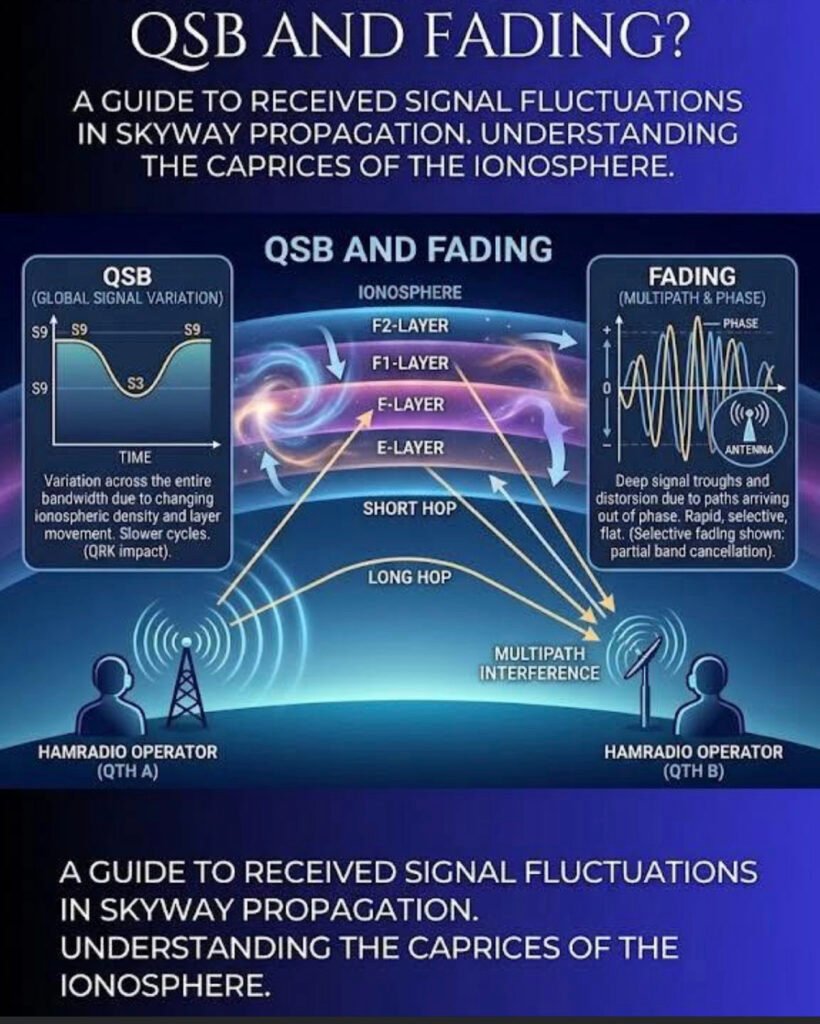
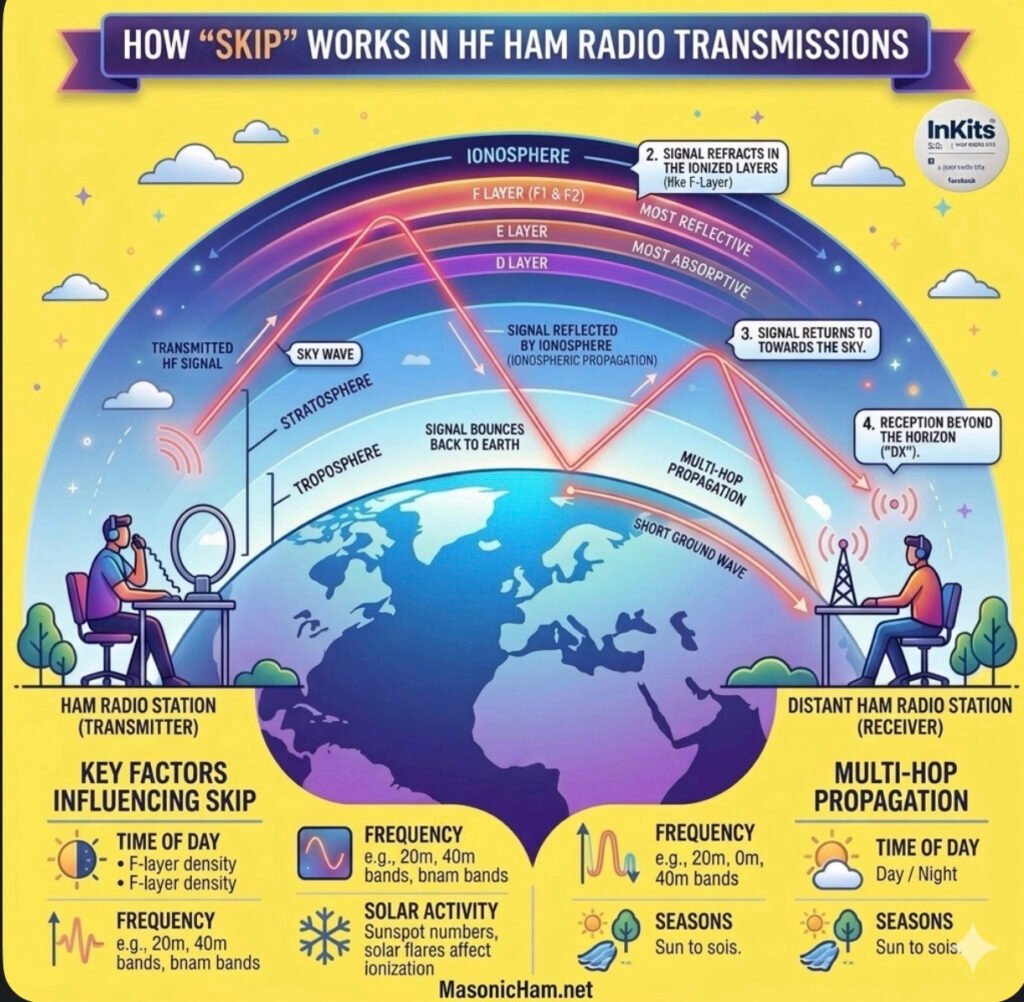
If you’ve spent any time on the high-frequency (HF) bands, you know the ionosphere is far from a stable mirror. It’s more like a moving, shimmering curtain. This graphic perfectly illustrates the two main ways that “shimmer” affects your signal: Global Signal Variation (QSB) and Multipath Interference (Fading).
1. QSB: The Slow Roller
In the left panel, we see QSB (a Q-code used to describe signal strength variation).
• What it is: A global change in signal intensity across your entire bandwidth.
• The Cause: As the sun’s radiation fluctuates or the density of the ionospheric layers (E, F1, F2) shifts, the “reflectivity” of the sky changes.
• The Effect: You’ll notice your S-meter moving from an S9 down to an S3 and back again over a period of seconds or even minutes. It’s a slow, rhythmic cycle that affects the whole signal equally.
2. The Ionospheric Layers: The “Bounce” House
The center of the image shows the Short Hop and Long Hop propagation.
• F2-Layer: Usually the highest and most important for long-distance (DX) communication.
• E-Layer: Lower down, often responsible for “Short Skip” or Sporadic-E openings.
The signal doesn’t just hit one spot; it can take multiple paths to reach the receiving station (QTH B).
3. Fading: The Phase Killer
The right panel highlights Fading, which is often much more “violent” and rapid than standard QSB.
• The Cause (Multipath Interference): Your signal travels via different paths—one might bounce off the F2 layer while another bounces off the E layer. Because these paths are different lengths, the signals arrive at the receiving antenna at slightly different times.
• The Result: When these signals meet, they can be out of phase. If the peak of one wave hits the trough of another, they cancel each other out.
• The Sound: This results in “selective fading,” where the audio might sound hollow, distorted, or watery. It’s not just getting quieter; the signal itself is being mangled in real-time.
The Takeaway for Operators
When you hear a signal “pumping” or distorting, you’re hearing the literal movement of the atmosphere miles above the Earth. While we can’t change the ionosphere, understanding these fluctuations helps us better time our transmissions and adjust our expectations for that rare DX contact.
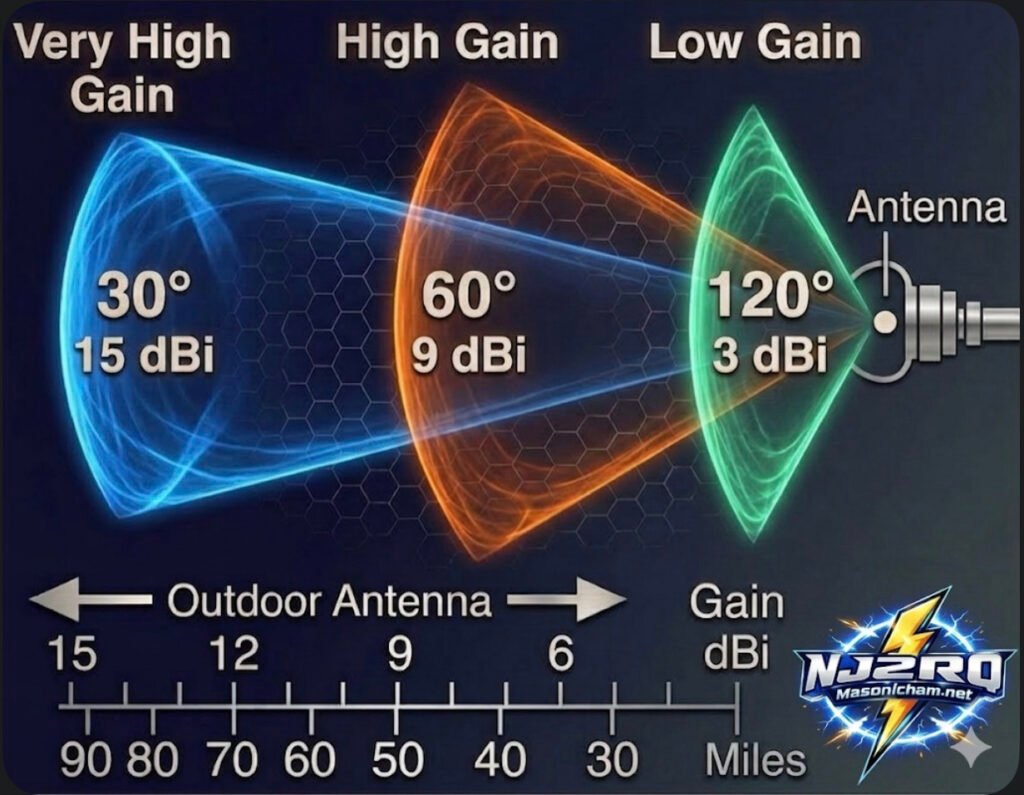
Have you ever wondered why some antennas claim to have “gain” while others don’t? It sounds like magic, but in the ham radio world, it’s actually all about how you focus your energy.
Check out this new card I put together to help visualize how it works:
The Big Secret: It’s Not an Amplifier!
Here is the most important thing to remember: with any antenna, the apparent increase in signal is not actually an amplification of the signal. Antennas are passive, meaning they don’t have a power plug to create more energy.
Instead, gain is simply the act of redistributing the available Radio Frequency (RF) signal into a preferred direction. Think of it like a flashlight: the bulb stays the same brightness, but the reflector concentrates all that light into a tight beam so you can see much further. Basically, antennas only divert, direct, or concentrate radio energy; they don’t create it.
Understanding the Trade-off
As you can see on the card, there is always a “give and take”:
Low Gain (3 dBi): You get a very wide coverage area (120°), but your signal doesn’t travel as many miles. Great for local ragchews!
High Gain (9 dBi): The beam narrows down to 60°. You lose some side coverage, but you gain a lot of distance—reaching out to about 50 miles in this example.
Very High Gain (15 dBi): This is a “laser beam” at 30°. It’s perfect for DXing (long-distance) because it concentrates your signal to reach 90 miles or more, but you have to point it exactly at the other station!
Pro Tip for the Shack: When you see a gain rating in dBi, it’s comparing the antenna to an “Isotropic” source (an imaginary point that radiates equally in every single direction like a perfect sphere). When you’re picking a Yagi or a directional wire antenna, remember that a higher gain number means you’re “squeezing” your signal into a tighter spot to reach further away!
What’s your go-to antenna for reaching those far-off DX stations? Do you prefer a wide “floodlight” or a narrow “spotlight”? Let me know in the comments!
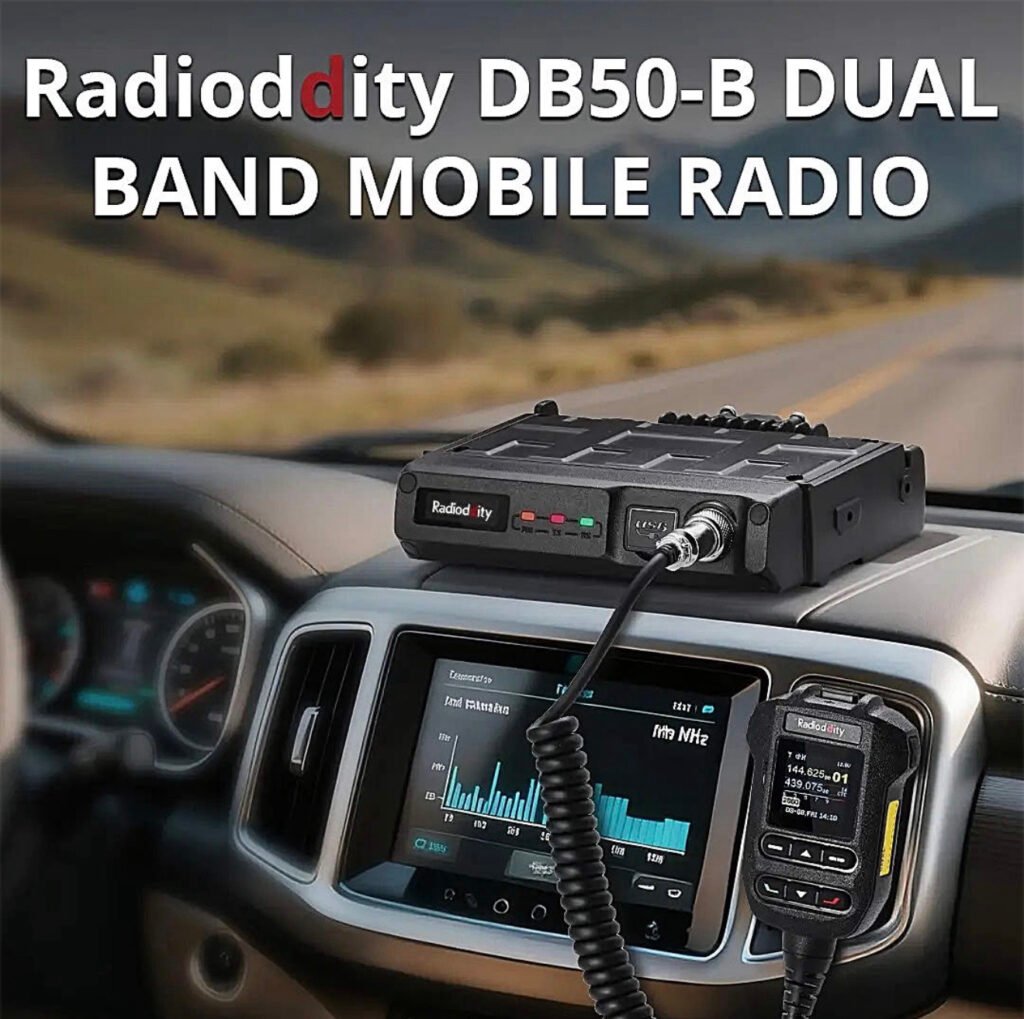
This mobile radio is a major step up for anyone tired of clunky menus and tethering themselves to a laptop just to program a few repeaters. The Radioddity DB50-B isn’t just another 50W mobile; it’s a smartphone-integrated powerhouse that changes how you interact with your gear.
If you’ve been in the ham hobby for more than five minutes, you know the “Mobile Radio Struggle.” You spend an hour mounting a radio in your truck, only to realize you need a proprietary cable and a Windows 10 laptop just to change a PL tone.
The Radioddity DB50-B just ended that era.
I’ve been putting this unit through its paces, and it’s clear: the “B” stands for “Bluetooth,” and it’s a total game-changer. Here’s why this radio needs to be in your shack (or your dashboard) right now.
1. No More Cables. Ever.
The headline feature is the app-based programming. You can configure channels, update settings, and even push firmware updates (OTA) directly from your smartphone via Bluetooth. Whether you’re on the trail or in the driveway, you can fix your programming in seconds without touching a PC.
2. APRS & KISS TNC Built-In
For the digital junkies and emergency prep crowd, this is huge. It has a built-in GPS and a Bluetooth KISS TNC. This means you can run APRS or even Winlink (using apps like RadioMail) directly through the radio. It turns your smartphone into a powerful digital terminal with zero extra hardware.
3. Serious Power, Small Footprint
Don’t let the compact size fool you. This is a true 50W powerhouse on both VHF and UHF.
• Dual Band / Dual Watch: Monitor two frequencies at once.
• AI Noise Reduction: The intelligent noise suppression actually works. It filters out wind and road noise, making your audio punch through even if you’re driving with the windows down.
• Airband Reception: Want to listen to local aviation? It’s built right in.
4. The “Microphone is the Radio” Design
The front panel is minimalist because the real control happens at the microphone and the app. The mic is ergonomic, easy to read, and puts every function at your fingertips. If you’re tight on space in a modern vehicle, this is the cleanest install you’ll ever find.
The Verdict: Should You Buy It?
If you want a radio that feels like it was built in 2025 rather than 1995, the answer is yes. It’s powerful, it’s digital-ready, and the smartphone integration makes every other mobile radio feel like a dinosaur.
If you’ve been exploring the world of digital amateur radio, you’ve probably heard about expensive handhelds packed with features that cost hundreds of dollars. But what if there was a radio that delivered modern digital capability, impressive performance, and incredible value all in one package?
Meet the Radioddity GD-168 — a handheld that is quietly becoming a favorite among operators who want powerful digital communication without breaking the bank.
And once you see what this radio can do, it’s easy to understand why.
A Radio Built for the Modern Ham
The GD-168 isn’t just another handheld—it’s designed for the modern amateur radio operator who wants flexibility.
With dual-band VHF/UHF capability, the radio works beautifully on both analog repeaters and digital DMR networks. That means you can check into your local net one minute and connect to operators across the globe the next.
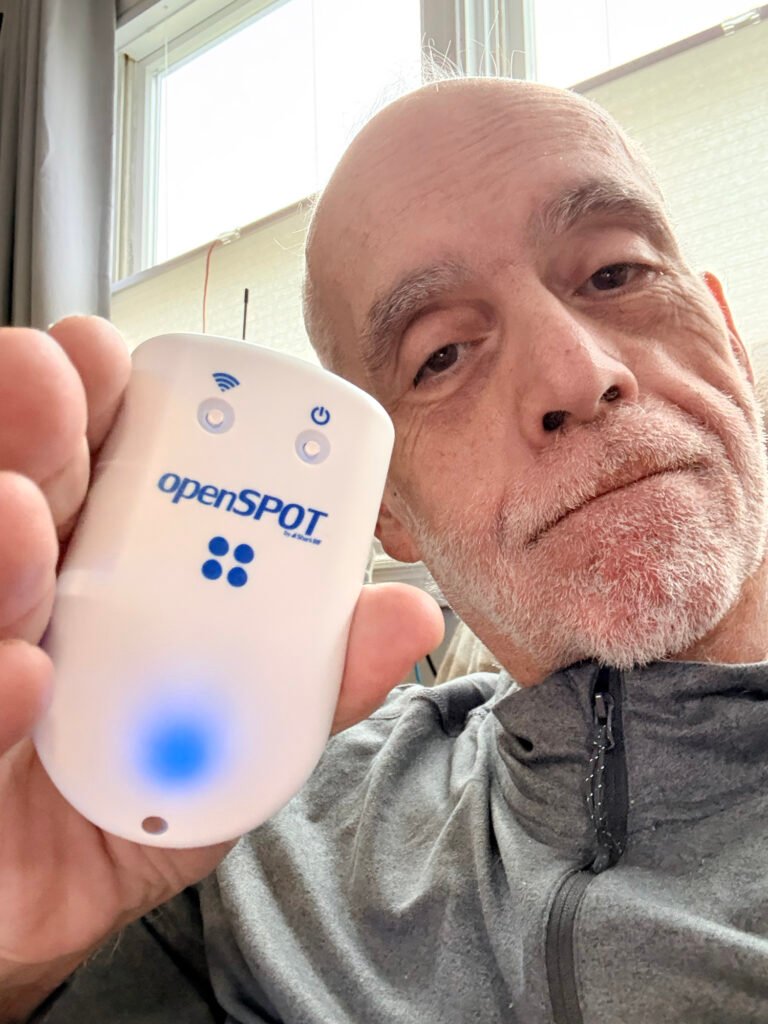
Whether you’re using a repeater or connecting through a hotspot like the SharkRF openSPOT4 Pro, the GD-168 delivers smooth, reliable communications.
And that’s where things get really exciting.
Talk Around the World From Your Handheld
Digital radio has changed amateur radio forever. Instead of being limited to local repeaters, operators can now connect through global networks and talk to hams around the world.
The GD-168 makes that experience effortless.
With support for DMR digital voice, you can connect to worldwide talkgroups and instantly communicate with operators across continents. One moment you’re chatting locally—next moment you’re talking with someone in Europe or Australia.
That kind of capability used to require expensive equipment. Now it fits in the palm of your hand.
Modern Features That Make Operating Easy
One of the first things you’ll notice is the bright color display. Channel information, talkgroup data, signal strength, and battery status are all presented clearly and cleanly.
But the real magic is under the hood.
The GD-168 includes:
• Dual-band VHF/UHF operation
• Analog and DMR digital modes
• USB-C charging and programming
• Large contact database capacity
• Clear, powerful audio output
Radioddity even includes two batteries and two antennas in the box, making the radio ready to go right out of the package.
Audio That Stands Out
A radio can have all the features in the world, but if the audio isn’t good, it doesn’t matter.
Thankfully, the GD-168 delivers clear and loud audio quality that makes conversations easy to understand—even in noisy environments.
Whether you’re operating from your shack, the car, or a portable setup, the radio provides strong, reliable communications.
Incredible Value
One of the biggest surprises about the GD-168 is the price. Radios with similar capabilities often cost far more.
Yet this radio delivers:
• Digital voice capability
• Dual-band operation
• Modern charging via USB-C
• Excellent audio performance
All in a radio that remains very affordable for most operators.
For new operators exploring DMR or experienced hams wanting a capable secondary radio, the GD-168 represents exceptional value.
Final Thoughts
Amateur radio continues to evolve, and radios like the Radioddity GD-168 are helping bring the hobby into the modern era.
It combines traditional ham radio operation with powerful digital connectivity, opening doors to communication that were unimaginable just a few decades ago.
For many operators, the GD-168 is becoming a favorite handheld for everyday operation, portable setups, and digital exploration.
And once you start using it, it’s easy to see why.
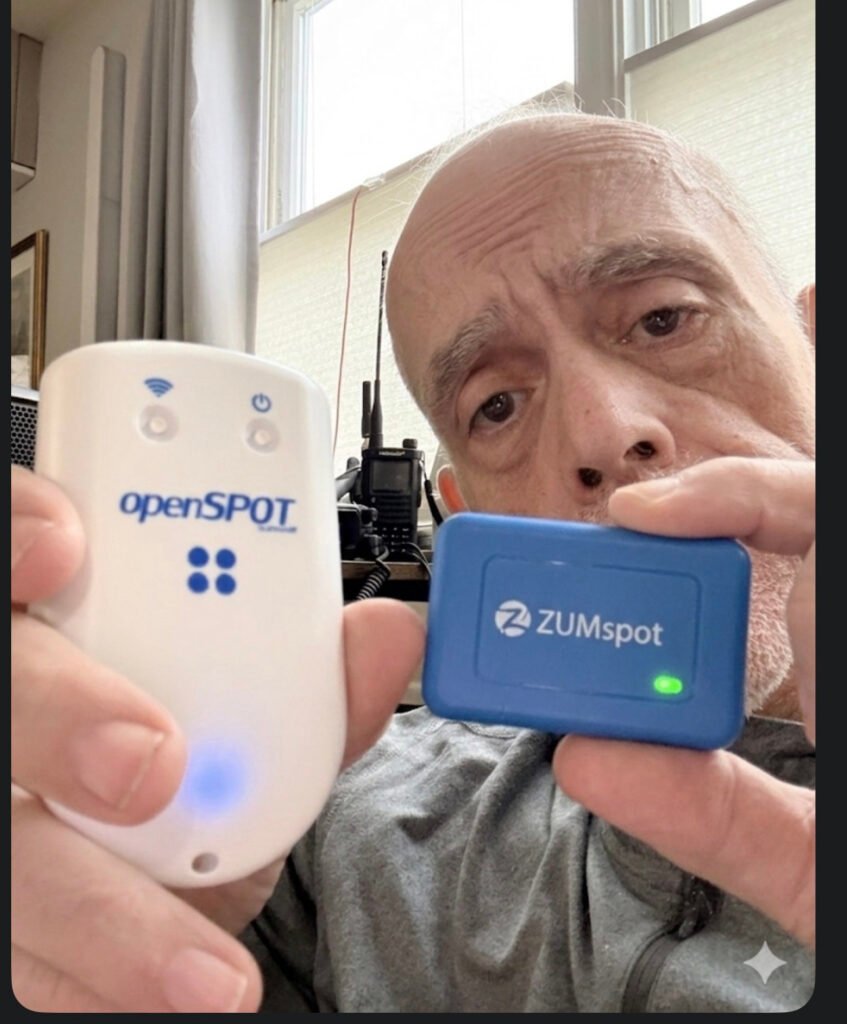
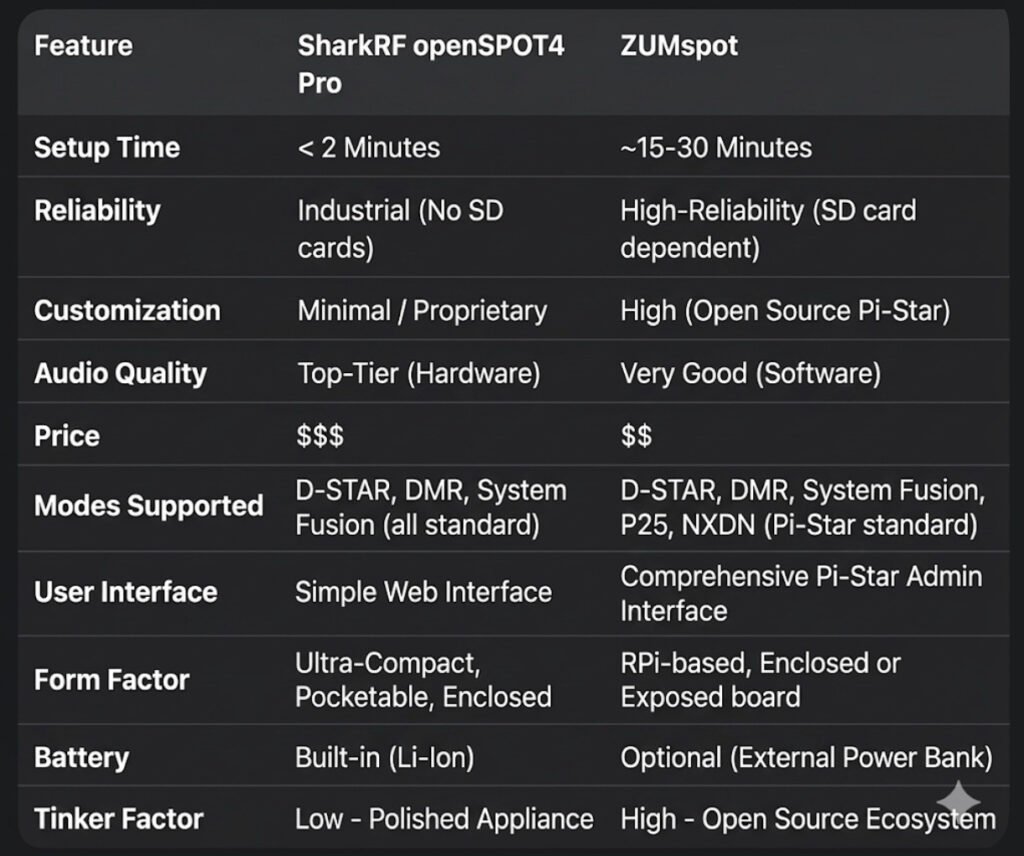
In the world of digital amateur radio, your hotspot is more than just a bridge—it’s the heart of your station. As we navigate the tech landscape of 2026, two names still dominate the conversation. But they couldn’t be more different. One is a sleek, “it just works” masterpiece; the other is the ultimate tinkerer’s toolkit.
If you’re standing at the crossroads of a purchase, it’s time to stop looking at spec sheets and start looking at how you actually want to spend your time in the shack.
The Philosophy of the “Appliance” vs. the “Computer”
The fundamental divide between these two devices isn’t just the price tag—it’s the operating system.
• The SharkRF openSPOT4 Pro runs on a Custom RTOS (Real-Time Operating System). It doesn’t use an SD card. It doesn’t “boot up” like a computer; it wakes up like a toaster. You can yank the power cord mid-transmission, and you will never face a corrupted file. It is built for the operator who wants zero friction.
• The ZUMspot is built on the back of the Raspberry Pi (Linux). It is a full-blown computer in the palm of your hand. While this gives you the power of the Pi-Star or WPSD ecosystems, it comes with the “Linux Tax.” You need a proper shutdown procedure, a high-quality SD card, and the patience to troubleshoot a kernel update every now and then.
Hardware Transcoding: The Pro’s Secret Weapon
This is where the “Pro” in the openSPOT4 Pro earns its keep. It houses a dedicated AMBE+2® hardware chip.
In 2026, cross-moding is the name of the game. If you want to use your favorite DMR handheld to talk on a D-STAR reflector, the SharkRF does the heavy lifting in hardware. The result? Audio that is crisp, clear, and devoid of the “underwater” robotic artifacts often found in software-based transcoding.
The ZUMspot, while incredibly capable, relies on the CPU for these conversions. It’s good—don’t get me wrong—but in a side-by-side “Golden Ear” test, the hardware-baked audio of the SharkRF wins every time.
Portability: The 30-Hour Myth?
SharkRF loves to tout that 30-hour battery life. In the real world, if you’re hitting the PTT frequently and running high RF power, you’re looking at 8 to 12 hours. It’s plenty for a day at the park, but it’s not a week-long expedition.
The ZUMspot has no internal battery, which sounds like a downside—until you realize you can plug it into a standard 20,000mAh USB power bank. That “clunky” setup will keep your ZUMspot humming for 3 to 4 days straight, making it the actual king of long-term emergency portable use.
The “No-Radio” Revolution
One of the most underrated features of the openSPOT4 Pro is SharkRF Link.
“Imagine being at a restaurant or a boring meeting and realizing there’s a massive net happening. You don’t have your radio. No problem.”
With the SharkRF app, your smartphone becomes the radio. It uses your phone’s mic and speaker to bridge directly into the hotspot. The ZUMspot, by design, almost always requires a physical transceiver to get your voice into the digital stream.
The Verdict: Which One Is For You?
Buy the openSPOT4 Pro if:
You want the “iPhone” experience. You travel, you want high-fidelity audio, and you want a device that is ready to talk before you’ve even finished your coffee.
Buy the ZUMspot if:
You want the “Linux” experience. You love the maker movement, you want a massive 3.5-inch color screen on your desk, and you find joy in the “build” as much as the “talk.”
The digital world is waiting. Which bridge are you crossing?
If you’ve been following my radio journey, you know I’m a sucker for gear that balances performance with value. That’s why I am beyond stoked to officially welcome Radioddity to the blog!
Whether you are just studying for your Technician license or you’re a seasoned DXer looking for your next field-op rig, Radioddity has been shaking up the amateur radio world for years. They aren’t just selling radios; they are making the hobby more inclusive by proving you don’t need a thousand-dollar budget to get clear signal reports.
Why I’m Excited:
• Innovation for Everyone: From the legendary (and rugged) handhelds to their sleek new HF rigs, they listen to the ham community.
• Built for the Field: Their gear is famous for being “SOTA-ready”—lightweight, durable, and ready for the trail.
• The “Bang for Buck” Factor: You’re getting modern features (like true dual-band monitoring and color displays) at a fraction of the usual cost.
Bottom line: If you’ve been waiting for a sign to upgrade your handheld or finally dive into digital modes, this is it.
🚀 Ready to see what’s new?
I’ve curated a list of my personal favorites—from the “bulletproof” starters to the high-end mobile units. Trust me, your shack (and your wallet) will thank you.
Welcome to the definitive guide on AllStar Link (ASL). If you are looking for the “Gold Standard” in linking amateur radios across the globe, you’ve found it. At masonicham.net, we don’t just use the tech; we master it.
1. What Exactly is AllStar Link?
AllStar Link is a high-performance network of amateur radio nodes and repeaters linked via the internet. Unlike older systems that can sound scratchy or “robotic,” AllStar uses Voice over IP (VoIP) technology—the same high-fidelity tech used by major phone networks—to transmit your voice.
The “Asterisk” Magic
The secret sauce is a software called Asterisk. Originally built for massive corporate phone systems, a brilliant Ham named Jim Dixon (WB6NIL) adapted it for radio. He created a module called app_rpt that allows a computer to act as a radio controller. This means your radio is no longer just a “walkie-talkie”; it’s a powerful, internet-connected broadcast station.
2. The Hardware: Building Your “All-Star” Station 🛠️
To get started, you need more than just a radio. You need a Node. Think of a Node as your personal gateway to the world. Here is the detailed breakdown of what’s inside:
The Brain: Raspberry Pi
Raspberry Pi 4 or 5: These are the current heavyweights. They have the processing power to handle high-quality audio without “jitter” or lag.
The OS: We use ASL3 (AllStarLink Version 3), built on the stable Debian Linux platform.
The Interface: The “Translator”
The computer (Pi) and the radio speak different languages. You need a USB Radio Interface (URI) to translate:
SHARI (SA818): A popular “All-in-One” USB stick that contains a tiny UHF or VHF radio. Perfect for talking around your house and yard.
External URI: If you want to connect a powerful 50-watt mobile radio or a mountain-top repeater, you use a dedicated URI cable (like those from Masters Communications) to link the Pi to the radio’s “Data” port.
The Radio
Handhelds: Any analog FM radio (Baofeng, Yaesu, Icom, Kenwood) works!
The Beauty of Analog: You don’t need a $600 digital radio. Your 20-year-old analog rig will sound like a million bucks on AllStar.
3. The Pro’s Cheat Sheet: Controlling the World ⌨️
Once your node is blinking and live, you control it using your radio’s keypad (DTMF tones). Here is the “MasonicHam Master List” of commands:
Command
Name
What it does
*3 <Node #>
Connect
Links you to any node in the world for a 2-way talk.
*2 <Node #>
Monitor
You can hear them, but they can’t hear you. Great for busy nets!
*1 <Node #>
Disconnect
Hangs up the connection so you can move to the next one.
*70
Status
The node “speaks” to you and lists everyone you are connected to.
*81
Time Check
Gives you the exact local time—essential for logging contacts.
4. Why AllStar Beats the Competition
Why are we so obsessed with AllStar at masonicham.net?
Audio Quality: Digital modes (DMR/D-Star) “crush” your voice into data bits, often making you sound like a robot. AllStar preserves the natural “warmth” of your voice.
Zero Latency: There is almost no delay. It feels like a real-time conversation.
Powerful “Hubs”: You can connect to huge rooms like HUBNet or the WIN System, where you can talk to 500+ people at once across dozens of countries.
🎬 Coming Soon to the Video Blog!
Reading the details is the foundation, but seeing the “Green Lights” flash is the fun part. Our upcoming video series right here on masonicham.net will feature:
The “First Boot” Walkthrough: Watch us flash the SD card and log into the AllStar “Cockpit” dashboard for the first time.
Leveling the Audio: We show you how to use the “On-Screen VU Meter” to make sure your voice is loud and clear without distorting.
The Global Tour: We’ll spend 10 minutes “node-hopping” across 5 continents to show you just how fast this network moves.
Join the All-Star Roster
This is more than a hobby; it’s global communication that YOU control. No cell towers, no big-tech algorithms—just you, your radio, and the world.
AllStar “First Aid”: Fixing Common Node Hiccups 🛠️🚑
You’ve built your node, you’re ready to talk to the world, but something is off. Don’t worry! Even the best All-Stars run into a “fumble” now and then. Here is how to get back in the game at masonicham.net.
1. The “Ghost” Connection (Timed Out) 👻
The Symptom: You try to connect to a node (like *3 <Node Number>), but your radio says nothing, or you hear “Connection Timed Out.”
The Fix: Port Forwarding. Your home router is like a security guard. If you haven’t told it to let AllStar traffic through, it will block the connection.
Action: Log into your router and forward UDP Port 4569 to the IP address of your Raspberry Pi.
Pro-Tip: If you’re on a public Wi-Fi or a cellular hotspot, they often block these ports. You might need a “VPN” or “Shrew” to get around it!
2. The “Whisperer” (Quiet Audio) 🤫
The Symptom: People tell you that you sound like you’re talking from the bottom of a well, or they can barely hear you.
The Fix: The SimpleUSB Tune Menu. Your node has a “digital volume knob” that needs to be dialed in.
Action: Log into your node’s terminal and run the command sudo simpleusb-tune-menu.
The Goal: Choose option 2 (Set RX Voice Level). While talking into your radio, watch the on-screen meter. You want your voice to hit between 3 KHz and 5 KHz on the scale. If it’s below 2, turn it up!
3. The “Robot Voice” (Distorted Audio) 🤖
The Symptom: You sound crunchy, robotic, or like you’re underwater.
The Fix: Check Your Levels & “Boost.”
Action: In that same simpleusb-tune-menu, look at Option B (Toggle RX Boost). If your audio is distorted, “Boost” is likely ON. Turn it OFF.
Radio Check: Make sure your handheld radio isn’t too close to the node’s antenna. This is called “RF Desense” and it makes your audio sound terrible. Move at least 10 feet away!
4. The “Long Talker” (Node Timeout) ⏳
The Symptom: You’re listening to a great conversation, and suddenly the node says “Node XXXX Timeout” and kicks you off.
The Fix: Adjust the TOT (Time Out Timer).
The Why: By default, AllStar nodes have a “safety switch” that cuts off the signal after 3 minutes (180,000 milliseconds) to prevent accidental interference.
Action: You can increase this in your rpt.conf file by changing the totime setting to a higher number (like 300,000 for 5 minutes).
🎬 Troubleshooting Live on the Video Blog!
Sometimes you have to see the meter move to understand it. In our upcoming masonicham.net Troubleshooting Special, we’ll show you:
The “Screaming” Test: How to properly set your mic gain so you’re the clearest voice on the reflector.
Router Mastery: A step-by-step look at a router’s “Port Forwarding” screen.
The “Magic Reboot”: When all else fails, how to safely restart your Asterisk software without unplugging the power.
We’ve Got Your Back!
Amateur Radio is a journey of learning. If you get stuck, remember that every “All-Star” started exactly where you are today. Keep tinkering, keep testing, and we’ll see you on the air!
Keep checking back at masonicham.net as we build out the most comprehensive AllStar library on the web!
Visit our sponsors in the link ads below and find some great opportunities;
So, you’re looking to step up your radio game beyond those blister-pack walkie-talkies from the toy aisle? Welcome to the world of GMRS (General Mobile Radio Service). It’s the “Goldilocks” of personal radio: more powerful than basic consumer sets, but way less intimidating than getting a full-blown Ham radio license.
Here is the lowdown on what makes GMRS the go-to choice for off-roaders, hikers, and emergency preppers.
1. What Exactly is GMRS?
GMRS is a licensed radio service operating in the UHF (Ultra High Frequency) range (462 and 467 MHz). While it shares some frequencies with the common FRS (Family Radio Service) walkie-talkies you see at big-box stores, it plays by much beefier rules.
The Key Differences
• Power: While FRS is limited to 2 watts, GMRS allows up to 50 watts for mobile/base stations and 5 watts for handhelds.
• Repeaters: This is the “killer feature.” GMRS allows the use of repeaters, which can extend your range from a few miles to 50+ miles by catching your signal and re-broadcasting it from a high tower or mountain top.
• Antennas: Unlike FRS radios (which must have fixed antennas), GMRS radios allow you to swap antennas or connect to a large one mounted on your vehicle or roof.
2. The License: No Test Required
One of the biggest perks of GMRS is the barrier to entry. Unlike Amateur (Ham) radio, there is no technical exam.
• Cost: As of 2026, the FCC fee is $35.
• Duration: The license lasts for 10 years.
• Coverage: Your single license covers your entire immediate family. If you have it, your spouse, kids, and even extended family can use the radios under your callsign.
3. Why People Use It
If you’ve ever tried to use a cell phone in a remote canyon or during a massive power outage, you know that “bars” are a privilege, not a right. GMRS fills that gap:
• Overlanding & Off-roading: Keep the convoy together even when the dust clouds are miles long.
• Emergency Comms: A reliable way to talk to neighbors or family when the grid goes down.
• Recreation: Perfect for coordinating on ski slopes, large campsites, or hunting trips.
4. The Gear
You generally have two choices when starting out:
1. Handhelds (HT): Portable, battery-powered “walkie-talkies.” Great for hiking and spotters.
2. Mobile Units: Radios bolted into your car or used as a base station at home. These pack the full 15–50 watts of power and usually require an external 12V power source.
Why Every Ham Needs a GMRS License in Their Back Pocket
We’ve all been there. You’re heading out for a family camping trip, a multi-car convoy to a Masonic Grand Lodge event, or just trying to set up a neighborhood emergency net. You reach for your HT, but then you realize: your spouse, your kids, and your non-ham brothers can’t legally touch the PTT on your 2-meter rig.
This is where the General Mobile Radio Service (GMRS) becomes the ultimate “utility player” in your comms kit.
What is GMRS?
Think of GMRS as the “Pro-sumer” version of the walkie-talkies you see at the store. It operates in the UHF band (462-467 MHz), right next to the license-free FRS frequencies. But unlike FRS, GMRS gives you the “Ham-lite” experience:
• Real Power: While FRS is stuck at 2 watts, GMRS allows up to 50 watts for mobile units and base stations.
• The Repeater Edge: GMRS is the only other personal radio service that allows repeaters. In areas like North Jersey, a well-placed repeater can turn a 2-mile handheld range into 40 miles of clear coverage.
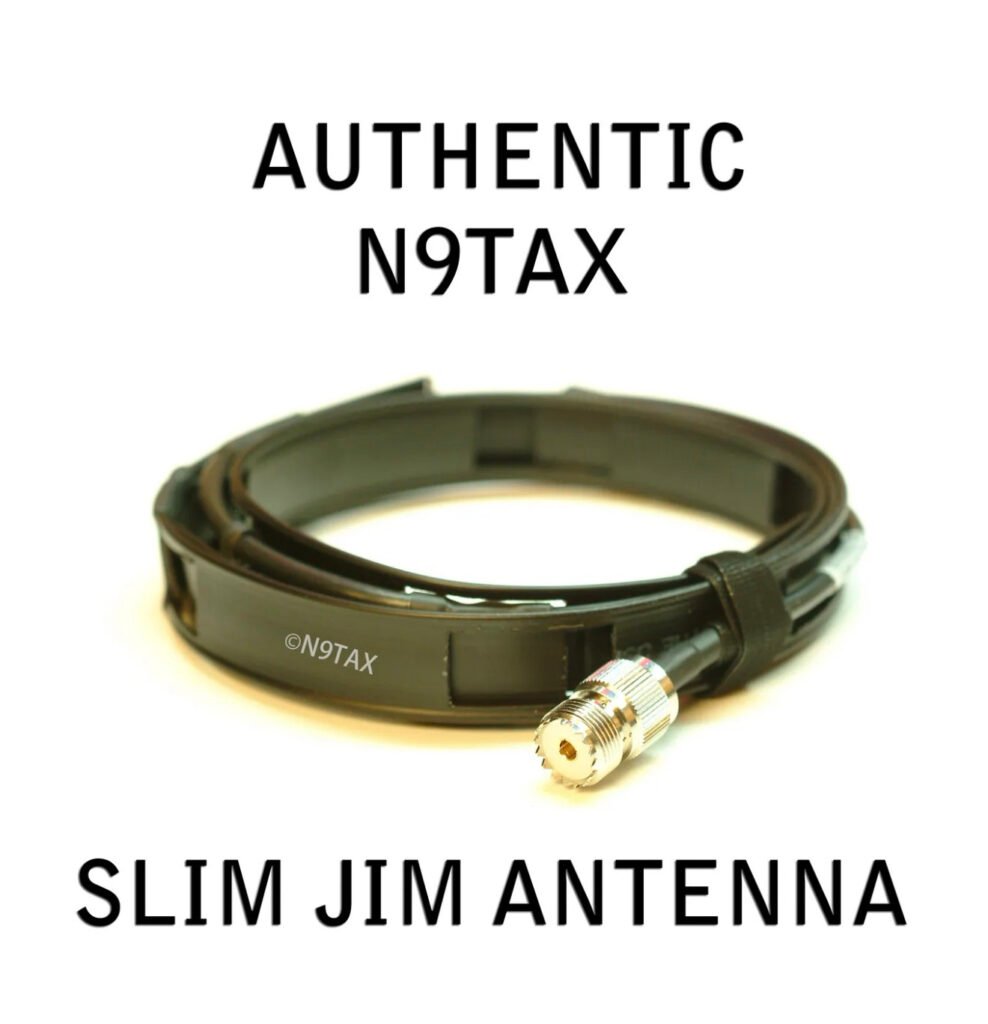
• Interchangeable Antennas: You aren’t stuck with a rubber ducky. You can run a dedicated Slim Jim or a mobile mag-mount to truly get your signal out.
The “Family Secret”
The best part for us hams? One license covers your entire immediate family. For the cost of a few pizzas ($35 for 10 years), your spouse, children, and even parents are legally cleared to operate under your callsign. No exams, no technical hurdles—just clear, reliable communication.
Is it a “Ham Replacement?”
Not at all. You won’t be chasing DX or working satellites on GMRS. But for tactical, local, and family-wide comms where you need “five-nine” reliability without the barrier of a technician exam for everyone involved, it’s an unbeatable tool.
While I spend a lot of time on HF and digital modes with my Yaesu rigs, I’ve recently been focusing on a project that hits much closer to home: Emergency Communications (EmComm). Specifically, I’ve been building out a home-based, off-grid mesh network to ensure my family can stay connected even if the grid goes down.
For this project, I’ve moved into the MeshCore ecosystem. While many start with basic LoRa setups, I’m finding that MeshCore offers the reliability and routing I need for a permanent home installation.
My current network infrastructure includes:
• MeshCore 3 v4: My primary high-power nodes for maximum reach.
Living in Bridgewater, we know that weather or infrastructure issues can occasionally knock out cell towers. By deploying these nodes, I’m creating a self-healing, “license-free” (but ham-improved) network. It allows for text-based messaging and GPS location sharing without needing a single cell tower or internet provider.
Integrating with the Shack
The beauty of this setup is how it complements my existing gear. Between the Yaesu FTM-310 in the truck and the MeshCore nodes at home, I’m building a layered approach to communications:
1. Local: MeshCore for instant family coordination.
2. Regional: VHF/UHF and digital modes (D-Star/DMR) via my openSPOT 4.
3. Long Range: HF via the FT-710.
What’s Next?
The next step is stress-testing the range between the 3 v4 and the 2v3 units in the wooded areas around my neighborhood. I’ll be posting those range test results soon!
Are you running MeshCore or Meshtastic? I’d love to hear about your node configurations in the comments.
One of the most unique aspects of amateur radio is the tradition of the “Elmer”—a mentor who provides personal guidance and inspiration to those new to the hobby. As I celebrate my progression to Amateur Extra and the launch of this blog, I wanted to take a moment to recognize the two brothers who made it all possible.
The Spark: Nomar (NP4H)
My journey actually started at the Lodge. Nomar (NP4H), the ARRL Northern New Jersey Section Manager, conducted the Technician classes that first sparked my interest. Without his dedication to teaching and his encouragement to sit for that first exam in August 2025, I might still be on the sidelines. His passion for the hobby is infectious, and he truly sets the standard for leadership.
The Guidance: Noel (W2MSA)
Alongside Nomar, Noel (W2MSA) has been a constant source of support and technical wisdom. Whether I was studying for my General and Extra or trying to figure out the nuances of my Yaesu rigs and digital hotspots, Noel was there to help bridge the gap between “reading the book” and “understanding the airwaves.”
Paying It Forward: The NJECT VE Team
In just a few short months, I’ve gone from a curious student to an Amateur Extra. My goal now is to pay that mentorship forward immediately. I am proud to share that I have joined the NJECT VE Team as a Volunteer Examiner.
It is an honor to work alongside such dedicated hams to help the next wave of operators get licensed. Between my work with the Fair Lawn Amateur Radio Club and this blog, I hope to be the same kind of resource for others that Nomar and Noel have been for me.
To Nomar and Noel: Thank you for the “73” and for welcoming me into this incredible community.
Meshtastic runs on small microcontroller boards with a LoRa radio. You can build handheld chat nodes, trackers, or always-on routers with a few off-the-shelf parts.
What every LoRa mesh node needs
Microcontroller board supported by the firmware (ESP32 or nRF52840 are most common)
LoRa transceiver (preferred: SX1262; older SX1276/78 also work)
Antenna matched to your regional band (433/470, 868, or 915 MHz)
Here’s a simple blog-style introduction to Meshtastic and MeshCore, and how they differ.
Going off‑grid: Meshtastic vs. MeshCore When cell towers and Wi‑Fi disappear, mesh radios let phones and small devices pass messages hop‑by‑hop. Two names you’ll hear in that space are Meshtastic and MeshCore. They’re related ideas, but aimed at different people and use cases.
What is Meshtastic?
An open-source, ready-to-use off‑grid communication system built around low‑power radios (often LoRa).
You buy or build small radio “nodes,” pair them to your phone, and chat, share GPS location, and send short data messages over a mesh.
Comes with polished firmware for popular DIY hardware and companion apps for Android, iOS, and desktop/CLI.
Designed for hikers, events, clubs, and emergency preparedness—simple setup, long battery life, and channel-based encrypted messaging.
What is MeshCore?
A developer-focused core mesh engine/library—the plumbing behind a mesh network.
Provides the fundamentals like packet handling, routing, and node discovery.
Intended to be embedded into custom firmware or apps; you add your own UI, features, and hardware integrations.
Not a turnkey “app you install”; it’s a building block for making your own mesh-enabled products or experiments.
Key differences at a glance
Audience:
Meshtastic: End users and tinkerers who want something that works today.
MeshCore: Developers who want to build or customize their own mesh solutions.
Scope:
Meshtastic: Full ecosystem—firmware, mobile apps, mapping/location, chat, and community support.
MeshCore: The core networking layer—lean, modular, and meant to be extended.
Hardware:
Meshtastic: Optimized for common low-power radio boards; documented, supported device list.
MeshCore: Hardware-agnostic by design; you choose radios/MCUs and integrate.
Setup:
Meshtastic: Flash a device, pair your phone, pick a channel, go.
MeshCore: Write code, configure your stack, and build your UX.
Features:
Meshtastic: Channels, encryption via channel keys, roles, location beacons, relay settings, and more out of the box.
MeshCore: Minimal core features; application features are up to you.
Interoperability:
Meshtastic-to-Meshtastic works out of the box.
MeshCore projects may or may not talk to Meshtastic unless they explicitly implement compatible protocols.
Which should you choose?
Choose Meshtastic if you want practical off‑grid messaging today with minimal fuss—trails, events, neighborhood groups, or preparedness.
Choose MeshCore if you’re building something custom—special hardware, unique routing behaviors, sensor networks, or integrating mesh into an existing product.
Can they complement each other?
Yes, conceptually. Meshtastic is a complete solution; MeshCore is the kind of foundation you’d use to build your own. Just remember that “mesh” is a pattern, not a single universal protocol—so compatibility isn’t automatic unless both sides implement the same message formats and crypto.
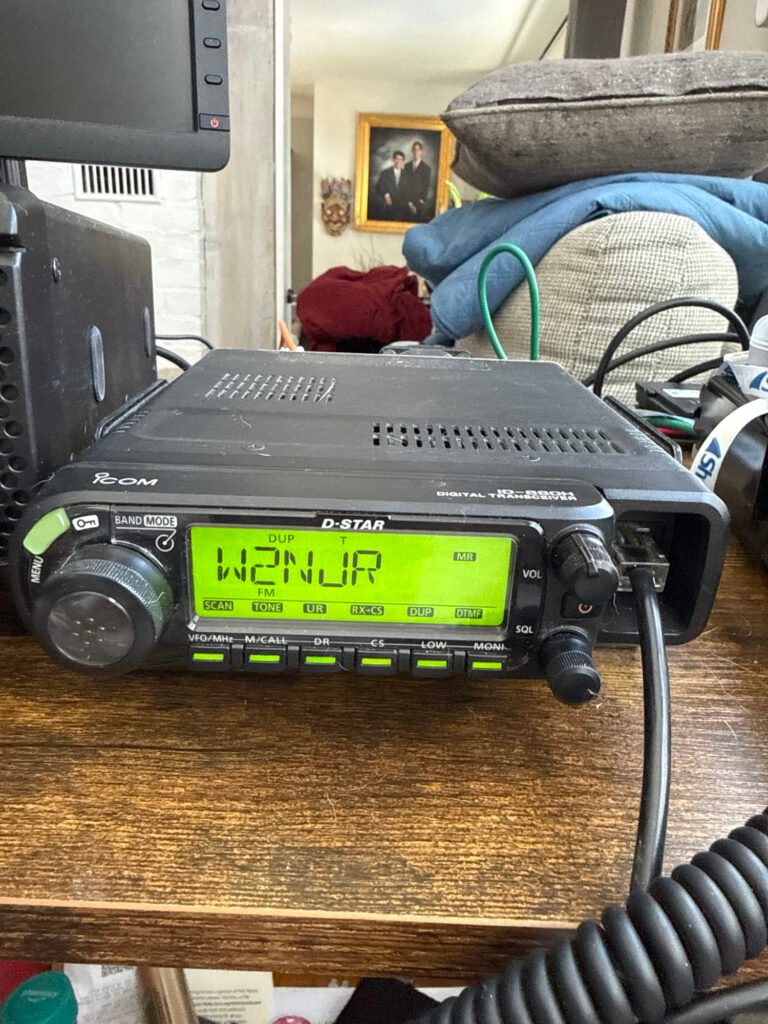
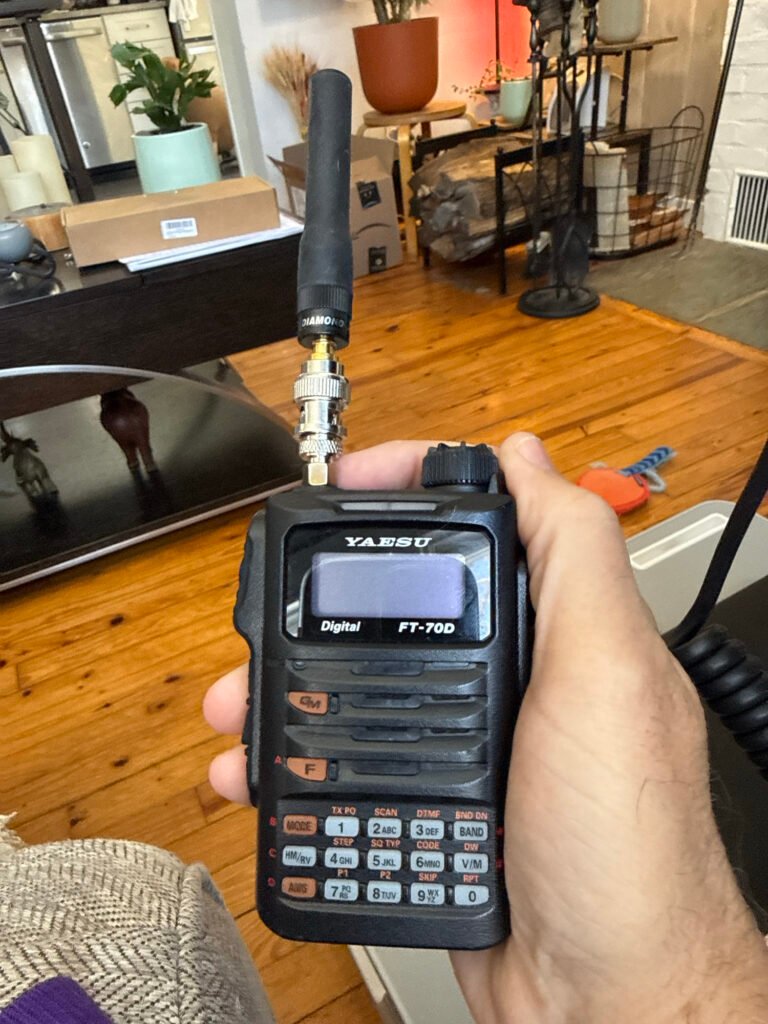
Before I got my mobile Icom ID-880H, I used my Yaesu FT-70D for hamming.
Icom ID-880H & Yaesu FT 70D
I started on the airwaves with these, on VHF/UHF accessing repeaters and talking to hams all over the state and far beyond at times. Having a Tech license this was my best option. Even as I advanced in licensing, this mode of communication remains as one of my favorites and most used. From home to car, airwave access. Talking to other hams and participating in the nets is Lots of fun!
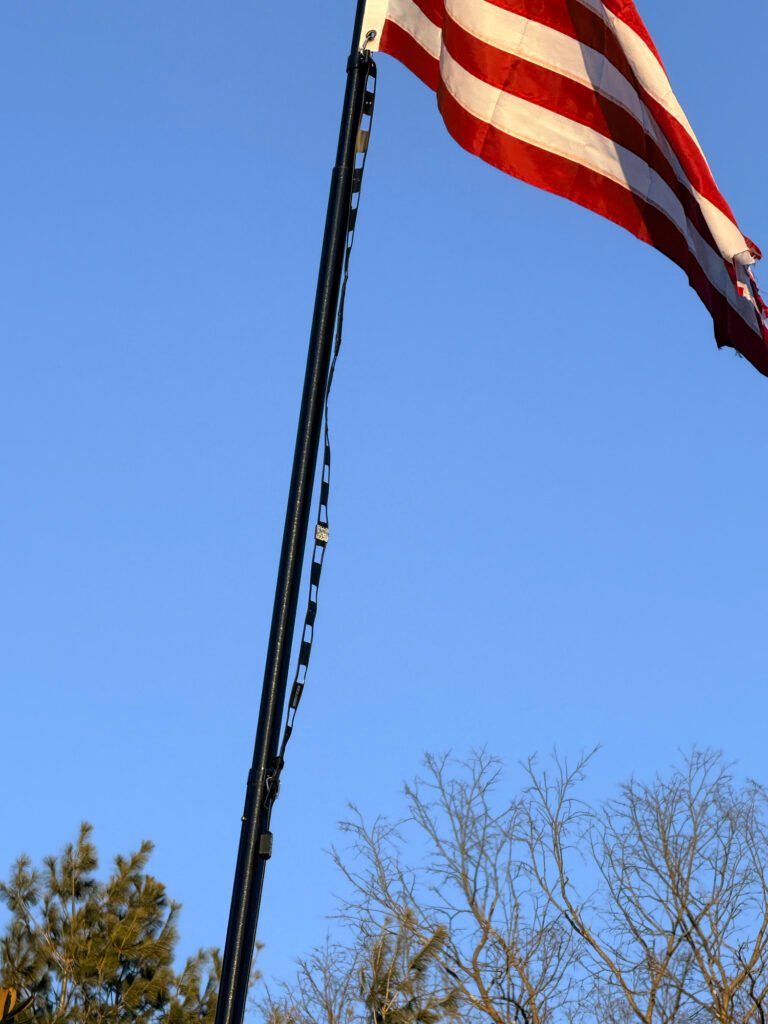
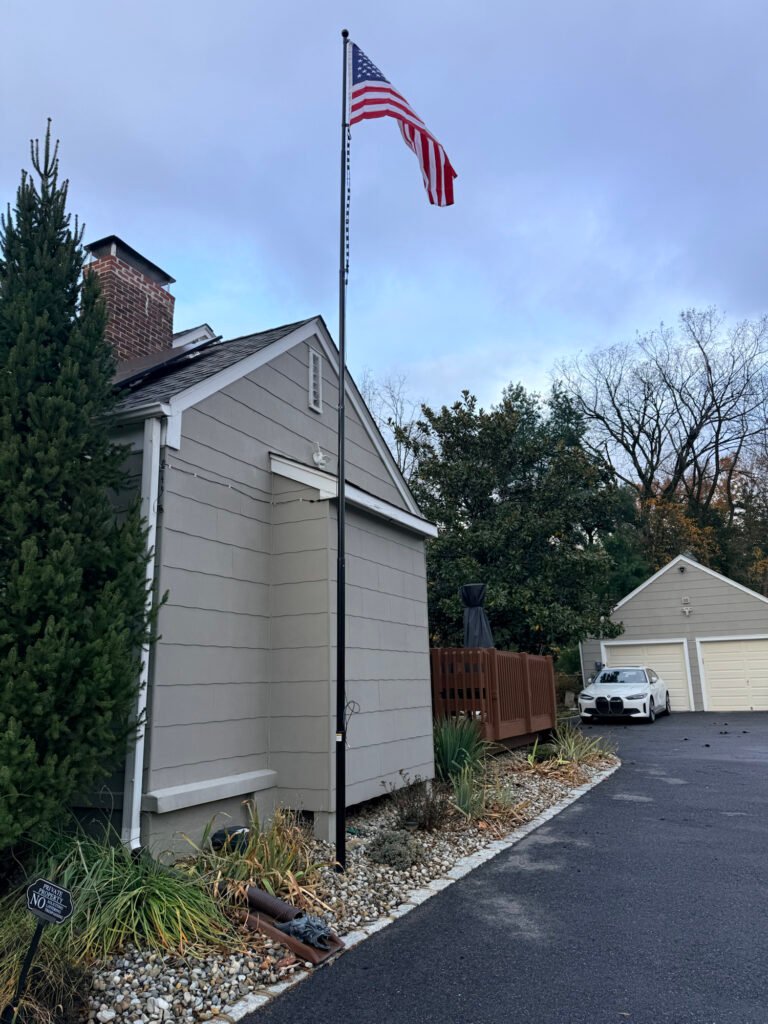
Getting a better signal in my home was important. Here is how I did it. On a budget and it works great! I started with an inexpensive but excellent antenna,
Up on a flag pole it went, but you can place this hanging by a window, inside or outside. The higher the placement, with limited RF interference, the better the gain.
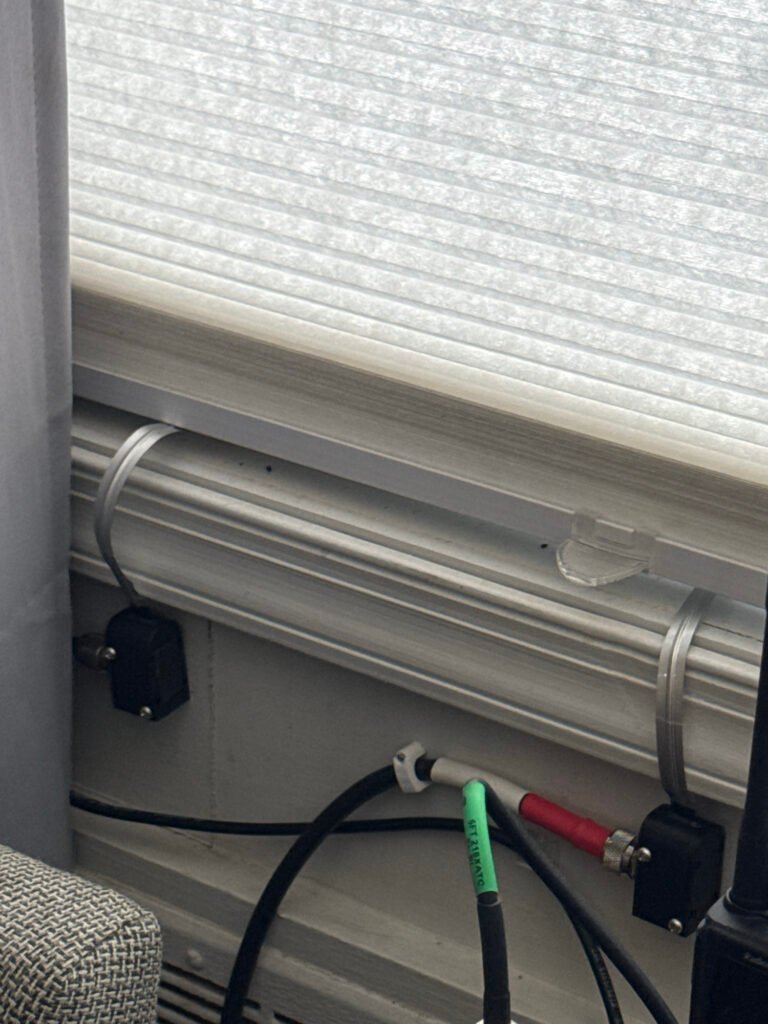
This is a portable flagpole. I dug and filled a base with a wider steel pipe 3 ft in ground. The pole can be brought down. In a future blog I will write about the other two antennas at the top, a HF End Fed and a vertical. in the following pics you will see how the coax came into home through the window.
One of the best things about getting my Amateur Technical license last year was finally feeling like I had a “seat at the table.” But as any ham will tell you, the license is just the ticket—the real learning happens when you key up during the daily grind.
The Power of the W2NJR Linked System
For those of you driving the NJ/NY corridors, the W2NJR linked system is a lifeline. Whether I’m heading into work or back home to Bridgewater, I can usually hit one of their many nodes.
Operating a handheld device inside a car can be challenging because the metal frame acts as a shield. However, the W2NJR system is so robust that I can stay crystal clear even at low power. I usually stay on the 440 MHz (UHF) side because it handles the urban “concrete jungle” and highway travel exceptionally well.
– A solid dual-bander is the perfect entry for Analogue and Digital.
Why You Need a Dedicated Car Setup
While the handheld is great, if you want to really “get out” there, a dedicated mobile setup is the way to go. Moving to a high-gain external antenna and a dedicated mobile rig allows you to:
• Hear More, Talk Further: A roof-mounted antenna solves the signal loss caused by your car’s tinted windows and metal roof. Check this one out and accessories below,
• Handle Traffic Better: I often hear hams reporting accidents on 78 or the Parkway long before they show up on my GPS. It’s real-time intelligence from people actually on the road.
The “Net” is Your Best Emergency Training
I’ve made it a point to check into the evening nets. If you’re looking to be more than just a “hobbyist,” this is essential. Here’s why:
• Emergency Preparedness: Nets are structured drills. Learning how to follow a Net Control Station (NCS) and pass traffic is exactly what we’ll need to do if cell towers go down during a major storm or emergency.
• Sharing Knowledge: Have a question about a new antenna or an upcoming NJ hamfest? The guys on the W2NJR repeaters are a wealth of information.
• The Masonic Connection: As a Freemason and member of Freemasons on the Air (FOTA), I appreciate the order and respect found in a well-run net. It’s a great way to meet brothers and fellow hams alike.
Essential Commuter Accessories
To make your mobile experience safer and more effective, I highly recommend these:
1. Speaker Mic: Keep your eyes on the road while you talk. I highly recommend this mic. I purchased it with no regrets,
2. Battery Eliminator: Handhelds are power-hungry on transmit. This keeps you at full power all the way home by plugging directly into your car’s power port. I got this one,
Amateur radio is a skill that requires practice. By using my commute to work the repeaters and join the nets, I’m not just passing time—I’m staying prepared for whatever comes next.
For car mobile antennas
I have this Comet antenna it’s awesome, far reaching
Once you have your radio and your license, the very first “digital” task is securing your DMR ID. Think of this as your digital license plate. Without it, you can listen to the traffic, but you cannot transmit on the digital networks.
The registration process is free, but it requires precision to avoid being rejected by the system. Here is how to do it right the first time.
Phase 1: Obtain Your Official FCC License PDF
RadioID.net (the central database) will not accept screenshots from QRZ or “Reference Copies” from the FCC website. You must provide the Official Copy that contains the FCC watermark.
2. Select “Download Electronic Authorizations” from the menu on the left.
3. Choose your callsign and click “Add >” to move it to the download queue.
4. Click “Download” and save the resulting PDF. This is the document you will upload later.
Phase 2: Registering at RadioID.net
This is the official clearinghouse for all amateur DMR IDs.
1. Visit RadioID.net and navigate to Register > User Registration.
2. Verify your Email: Enter your primary email address. You will receive a verification link immediately. You must click this link to continue the process.
3. Submit Your Details: Fill in your name, address, and callsign exactly as they appear on your license.
4. Upload the PDF: When prompted, upload the Official Copy PDF you downloaded from the FCC in Phase 1.
5. The Wait: A team of volunteers manually verifies every application. It typically takes 24 to 48 hours to receive your 7-digit ID via email.
Phase 3: Securing Your BrandMeister Account
Once you have your 7-digit ID, you need to create a BrandMeister account. This is essential if you plan on using a hotspot.
1. Register: Go to BrandMeister.network and create an account using your new DMR ID.
2. Set Your Hotspot Security: Once logged in, go to “SelfCare.” You must create a Hotspot Security Password.
3. Why this matters: This password acts as a “key” for your hotspot. Without it, your hotspot will not be allowed to connect to the BrandMeister servers.
Pro-Tips for Success
• One ID is Enough: You do not need a separate ID for every radio you own. Use the same 7-digit ID for your handheld, your mobile rig, and your hotspot.
• Check Your Spam: Approval emails often get flagged as junk. If it’s been 48 hours, check your spam folder before re-applying.
• The “Watermark” Rule: If your uploaded license says “Reference Copy” across the front, it will be rejected. Always use the “Download Electronic Authorizations” tool in the FCC portal.
Getting on DMR is much easier than it first appears. You don’t need expensive equipment or deep technical knowledge—just a few basic pieces and a little initial setup. Once that’s done, DMR is as simple as turning a knob and pressing a button.
1. A DMR-Capable Radio
Not all radios support DMR, so the first requirement is a radio specifically designed for it. These come in:
Handheld (HT) radios – great for beginners and portable use Mobile radios – higher power, ideal for vehicles or home use
Many popular and affordable models are available, and most are capable of both DMR and analog FM, so you don’t lose any functionality by going digital.
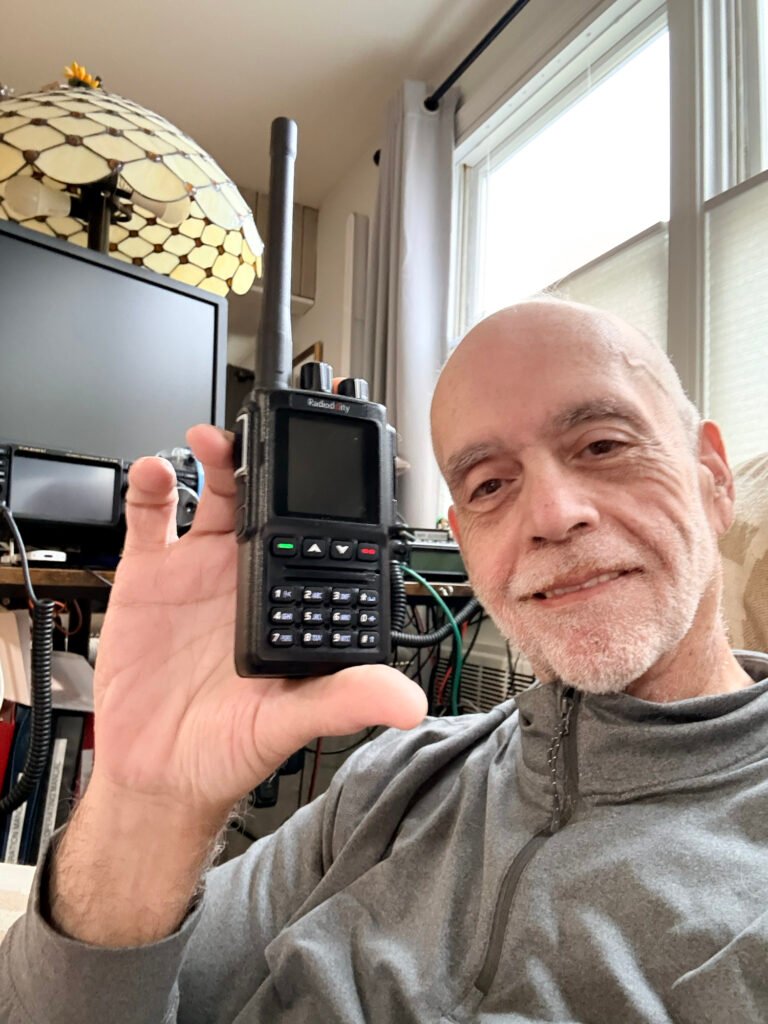
This is the one I purchased and will review in upcoming posts,
The Radioddity GD-168
2. A Free DMR ID
Every DMR user has a unique DMR ID number, which acts like a digital callsign. This allows networks to identify who is talking and enables features like call routing and contact lists.
It’s free You apply once It works worldwide
Once assigned, your DMR ID is programmed into your radio and used automatically.
The how to in the next post.
3. Access to a DMR Repeater or Hotspot
To talk beyond simple radio-to-radio range, you’ll need one of the following:
DMR Repeater A local repeater connects you to nearby hams and to larger networks. Many areas already have excellent DMR coverage. Personal Hotspot (Optional) A hotspot is a small device that connects your radio to the internet through your home network or phone. It lets you use DMR from anywhere, even if no repeater is nearby.
Beginners often start with repeaters and add a hotspot later.
This link leads to a hotspot i just purchased and will be reviewing soon.
Its a great starter hotspot, easy to assemble and program. Make sure you follow the included instructions.
4. Basic Radio Programming (Codeplug)
DMR radios use a configuration file called a codeplug. This tells the radio:
Your DMR ID and callsign Which repeaters to use Which talkgroups are available How channels are organized
Most clubs, mentors, or online groups are happy to share starter codeplugs. Once loaded, daily operation is simple and intuitive.
5. A Talkgroup to Join
Talkgroups are the heart of DMR. They are shared conversation spaces that can be:
Local (club or city) Statewide or regional Nationwide Worldwide
You choose the talkgroup—your radio handles the rest. Switching talkgroups is as easy as changing channels.
6. Internet (Indirectly)
Unlike analog repeaters, most DMR networks use the internet to link repeaters and users together. You don’t connect directly—repeaters and hotspots do that for you—but this is what makes worldwide communication possible.
If the internet goes down, local DMR repeaters still work just like traditional repeaters.
What You Don’t Need
Let’s clear up a few common worries:
❌ No monthly fees ❌ No special license beyond your amateur radio license ❌ No computer required once setup is complete ❌ No constant reprogramming
Once your radio is set up, DMR becomes turn on, select, talk.
The Best Way to Start
Most new operators succeed fastest by:
Starting with one radio Programming one local repeater Adding a few talkgroups Making their first contact
From there, everything else grows naturally.
DMR rewards curiosity, but it doesn’t demand perfection. Every operator—no matter how experienced—started with that first digital transmission. And once you hear your call sign come back from someone hundreds or thousands of miles away, you’ll understand why so many hams say:
If you’ve ever picked up a radio, pressed the push-to-talk button, and enjoyed the magic of being heard across town—or across the county—you already understand the heart of amateur radio. DMR (Digital Mobile Radio) builds on that familiar experience and adds clarity, flexibility, and worldwide reach, all while still feeling like radio.
At its simplest, DMR is just talking—digitally instead of analog. Your voice is converted into digital data, sent over the air, and then reconstructed on the other end. The result is audio that stays clear even when signals are weak, background noise is reduced, and conversations sound consistent from beginning to end.
Analog Radio: The Traditional Experience
Analog FM is where most hams start, and for good reason—it’s simple and reliable.
With analog:
One conversation uses one frequency at a time As signals weaken, audio becomes noisy or distorted Anyone on the frequency hears everything Coverage is limited to the repeater or simplex range
Analog radio feels very natural—like talking louder or quieter depending on how far away someone is. It’s easy to use, requires little setup, and remains essential for local communication and emergency use.
DMR: The Digital Upgrade
DMR takes that same push-to-talk experience and adds digital efficiency and smart networking.
With DMR:
Two conversations can happen at the same time on one frequency Audio stays clear until the signal drops out completely Conversations are organized into talkgroups You can talk locally or worldwide, by choice
Instead of everyone hearing everything, DMR lets you choose who you want to talk to. Think of talkgroups like channels inside a channel—local club chat, statewide coordination, national calling, or worldwide discussion, all sharing the same repeater without interfering with each other.
Simple Analogy
Analog is like a party where everyone is in one room—you hear all conversations at once. DMR is like the same building with many rooms—you walk into the one you want.
What About Complexity?
DMR does require a little setup at first. Radios are programmed with a codeplug, which tells the radio which talkgroups, repeaters, and settings to use. That may sound intimidating, but once it’s done, using DMR is just as easy as analog:
Select a channel Press PTT Talk
Many hams find that learning DMR actually reignites the joy of experimenting—programming, troubleshooting, and understanding how digital networks work—without taking away from the fun of operating.
Why Beginners End Up Loving DMR
Clear audio, even in tough conditions More conversations with less interference Instant access to local and global communities A gentle introduction to digital modes
DMR doesn’t replace analog—it complements it. Most operators use both, choosing the right tool for the moment. Analog remains perfect for simple local communication, while DMR shines when you want flexibility, reach, and control.
For many newcomers, DMR becomes the moment when amateur radio stops feeling limited by distance—and starts feeling limitless.
For a long time, Brother Nomar (NP4H) held technician classes at the Lodge. He always hoped I would join them someday, but I’ll be honest: I wasn’t sure my memory was up to the task. We all get a little older, and learning new things doesn’t always come as easily as it used to. I just wasn’t sure I could pull it off.
Then, this past August, Nomar mentioned another upcoming class. Something clicked, and I finally said yes.
The Technician Jumpstart
The class was a two-day “cram” session with the exam on the second afternoon. To prepare, I downloaded a study app and spent time watching YouTube videos to wrap my head around the concepts. When test time came on that second day, I passed! I was in total disbelief—not only that I did it, but that I actually remembered everything I had studied.
That same day, Nomar had invited another Brother—a state-authorized Yaesu dealer—to bring some equipment for sale. I walked out of there with a Yaesu FT-70DR. In my opinion, it’s the best little radio anyone can buy, and I strongly recommend it as a first radio (just make sure you buy through an authorized dealer!). That was the moment the passion really took hold.
Leveling Up: The General License
With the Technician license under my belt, I immediately set a new goal: General. I made a deal with myself—if and when I passed, I’d treat myself to the Yaesu FTDX10 (or the FTM-710).
Shortly after passing the Tech exam, I received my official FCC email with my first call sign: KE2GPQ. I got on the air immediately, finding a deep interest in emergency communications. I started listening to the nets, specifically the W2NJR repeater system. There are so many great people on there, and it made the hobby even more fun.
I kept up the routine—apps and YouTube—and soon enough, I passed the General exam. I snagged a great deal on my Yaesu FT-710, and suddenly, I was riding the HF waves. Making those first QSOs was an incredible rush.
Giving Back: The Extra and Beyond
So, what was next? I wanted to give back to the community and serve the hobby, so I decided to go all the way for my Amateur Extra license. I attained that in November, completing the trifecta in just a few months.
Once I was an Extra, I applied for a vanity call sign to make it my own. I traded in KE2GPQ for NJ2RQ.
That is my short history of the three licenses, bringing you up to date with my radio endeavors so far. It’s been a whirlwind, and I’m just getting started.
If you’re looking for an exciting hobby that connects you with people from all around the world, amateur radio is a fantastic choice. Whether you want to talk to friends or explore the world of radio technology, this guide will help you start your journey in easy steps.
Step 1: Understand the Basics
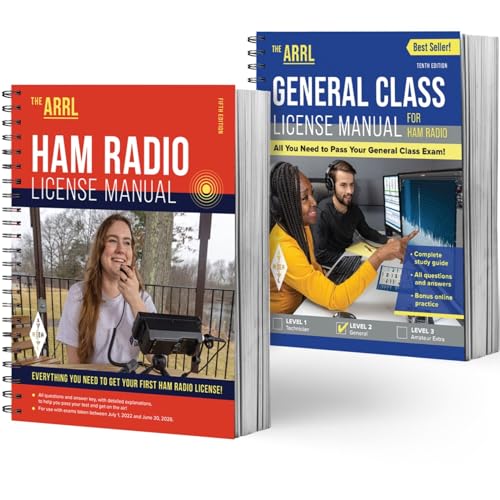
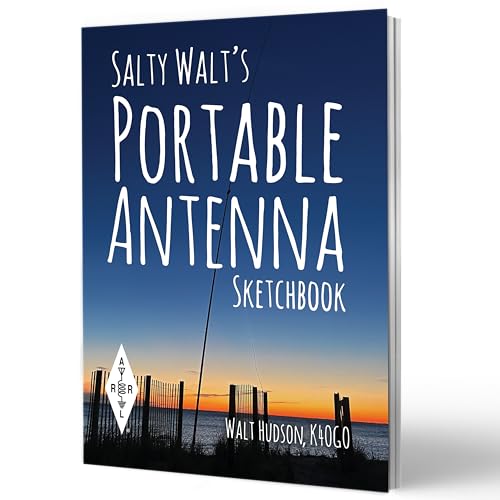
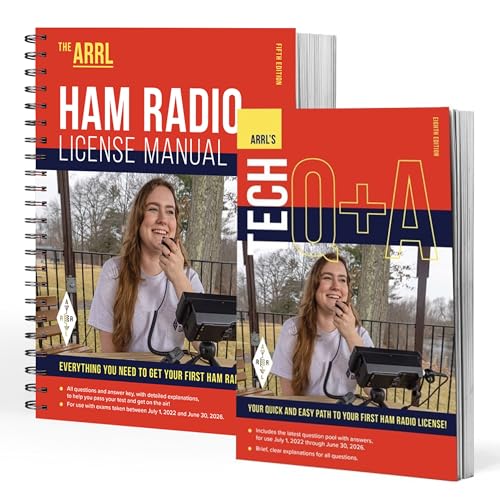
To get started, familiarize yourself with the fundamental concepts of amateur radio. This includes learning about the different frequency bands, available equipment types, and licensing requirements in your country. Understanding these basics is key to ensuring a smooth transition into the amateur radio community. Here are some great books that can assist you in the licensing process.
Getting licensed as an amateur radio operator is a straightforward process that begins with the Technician Class license, the entry-level gateway to the hobby. To earn it, you must pass a 35-question multiple-choice exam covering basic radio theory, regulations, and safety. Once you pass, you’ll register with the FCC to receive your official call sign. There is no longer a Morse code requirement for any U.S. license, making it more accessible than ever for new hobbyists to start transmitting on VHF and UHF bands.
Helpful Resources & Links
ARRL (American Radio Relay League): As the national association for amateur radio, the ARRL is the best place to start. They offer a Step-by-Step Licensing Guide and an Exam Session Search to find a test location near you (often hosted by local clubs).
FCC Guidelines: The FCC regulates the service under Part 97 rules. You must obtain an FCC Registration Number (FRN) through the CORES system before taking your exam. Note that the FCC charges a $35 application fee for new licenses, payable after you pass your exam.
HamStudy.org: A popular, free tool for tracking your progress through the question pools.
Quick Reference Table
License Class
Exam Length
Best For
Technician
35 Questions
Local communication, handheld radios, and emergency prep.
General
35 Questions
Worldwide “DX” communication on High Frequency (HF) bands.
Amateur Extra
50 Questions
Full access to all U.S. amateur frequencies and modes.
Stay tuned for my personal experience, which radios I started with, and where I am in the journey at present. I will share my interests, successes, and failures (we learn from them).
Welcome to the official blog of NJ2RQ! As an amateur extra and past Grand Master of Masons in New Jersey, my journey through Freemasonry and amateur radio has been transformative. Over the past four months, I have transitioned from a technician to an amateur extra license holder, marking an important milestone in my amateur radio experience.
The Freemasons on the Air Community
One of my exciting ventures has been the growth of the “Freemasons on the Air” (FOTA) community. This group has become a platform for Masons to share their experiences, knowledge, and passion for amateur radio. Through our collective efforts, we have fostered a welcoming environment where brothers can engage in discussions that connect ancient traditions with modern technologies.
Continuous Learning and Fraternal Connection
Amateur radio and Freemasonry share a unique bond that emphasizes continuous learning and mutual support. As I share my experiences and insights, I encourage fellow Masons to explore the world of amateur radio. It opens up opportunities for communication, learning, and making lasting connections across frequencies. This journey is not just about acquiring a license; it’s about building a community that values growth, knowledge, and fraternity.
As I document my progress and the expansion of the FOTA community, I invite you to join me. Together, let’s explore the intersection of these two rich traditions and continue our journey of learning and connection.
Welcome to the official blog of nj2rq, where I share my personal journey from technician to Amateur Extra in just four months. As a Past Grand Master of Masons in New Jersey, I’ve experienced the rich traditions of Freemasonry and its intriguing ties to the world of amateur radio.
The Roots of Freemasonry and Amateur Radio
Freemasonry is an ancient fraternity grounded in symbolic traditions and values that promote personal growth and community connection. While many may not immediately see the parallels, the principles of Freemasonry resonate strongly with the ethos of amateur radio. Both emphasize communication, learning, and the sharing of knowledge. In fact, my involvement with the “Freemasons on the Air” (FOTA) community has provided a unique platform to bridge these worlds.
Learning and Growth through FOTA
Joining the FOTA Facebook group has been a transformative part of my amateur radio experience. Not only does it foster a space for ongoing learning, but it also cultivates fraternal bonds across the various frequencies. This community reflects the essence of Freemasonry as members support each other’s growth while sharing knowledge and expertise. Through regular interactions, I’ve found that the journey is not just about mastering technology but also about nurturing friendships and shared values.
In conclusion, my brief journey in amateur radio has highlighted the harmonious connection between the ancient craft of Freemasonry and the modern science of amateur radio. The principles of Freemasonry continue to guide my exploration as I navigate this fascinating world, constantly learning and connecting with others.